Manual
Copyright © 2004 Neuberger & Hughes GmbH
Copyright © 2004 NLcom, Maastricht, the Netherlands.
Contact information:
Neuberger & Hughes GmbH
Im Bruckenwasen 1
Plochingen
73207
Germany
phone: +49 (7153) 6120-0
fax: +49 (7153) 6120-33
mail: info@n-h.net
N&H helpdesk system:
web: http://support.n-h.com
mail: support@n-h.com
Internet:
http://www.n-h.com
http://exchange4linux.com
The manufacturer and the importer reserve the right to revise or alter the contents of these documents without further notice. This manual is to be used for informational purposes only, and neither contains nor implies any obligations for manufacturer, importer or the retailer of these products. The aforementioned Parties accept no responsibility whatsoever for errors or deviations in this manual and cannot be held responsible in any way, in the event of damage or losses that are the results of proper or improper use of this manual.
This manual can not be, partially or in its entirety, reproduced, translated, transmitted via a data-connection or converted into a otherwise readable format without express written consent of the supplier, manufacturer and/or the authors of this manual, with the sole exclusion being reserve-copies intended for the authorized user.
The brand- and product-names mentioned in this edition are, in several cases, copyrights and/or have a registered trademark of the related enterprises. Their recognition in this manual is for legal purposes only and is not meant to be construed as a recommendation of the related products or their manufacturers.
Table of Contents
- Preface
- I. Explanation and terminology
- II. Before you start
- III. Configuration and management
- 6. exchange4linux configuration
- 6.1. General
- 6.1.1. Introduction
- 6.1.2. Appendices
- 6.1.3. exchange4linux models and versions
- 6.1.4. Placement of exchange4linux
- 6.1.5. Attaching a PS/2 keyboard
- 6.1.6. Network connection
- 6.1.7. Attaching a router/ADSL/cable modem
- 6.1.8. Booting the system
- 6.1.9. Conditions for using the management software
- 6.1.10. Starting the management software
- 6.1.11. Logging onto exchange4linux
- 6.1.12. EasyConfig main menu
- 6.1.13. Navigation
- 6.1.14. Shutdown / reboot exchange4linux
- 6.1.15. Language settings
- 6.2. Profiles
- 6.3. Backup Service
- 6.4. License
- 6.5. Email settings
- 6.6. Spamfilter
- 6.7. Easy PDF Service
- 6.8. Faxserver
- 6.9. Network
- 6.10. DHCP server
- 6.11. EasyShare
- 6.12. Nameserver
- 6.13. Alternative Name servers
- 6.14. System actions
- 7. User guide
- IV. Client settings
- A. Copyright & License Information
Thank you for choosing a Neuberger & Hughes’ exchange4linux product. We have made all possible efforts to make this manual as extensive and clear as possible for both the inexperienced user and the professional system administrators. In case you still have questions, please consult the on-line N&H Support System at http://support.n-h.com. To use this and other support tools, you need to have a valid support contract. For more information on the support possibilities, please contact Neuberger & Hughes.
This manual consists of four parts. When you want to start directly with the installation of the exchange4linux Server Suite, we advice you to read at least part II: "Before you start". This section contains important information that can prevent confusion while using exchange4linux.
This part shall help you to develop a better understanding of the network possibilities and to get to know some special expressions you need to set up exchange4linux.
exchange4linux can manage one dedicated network. The internal IP-addresses are, contrary to the IP-addresses used on the Internet, only visible for computers within the network. Depending on the size of the network, a specific range of IP-addresses must be used. The possible ranges are sorted in several classes:
- C-Class network:
This class enables you to assign 256 IP-addresses within the network. These addresses have to start with: 192.168. ... . ...
On the third position must be a value between 0 and 256, eg. 192.168.2. ...
The last position must be a 0, in this case the network address would be: 192.168.2.0
When using a DHCP server, the settings of this server have to match the values mentioned above. In this case, IP-addresses can be assigned in the range 192.168.2.0 to 192.168.2.255 with the exception of the IP-address used by exchange4linux itself.
-
B-Class network:
When more than 256 addresses are needed, one can use a B-Class network. This allows you to assign 256*256 IP-addresses. The range must start with 172. ... . ... . ...
The second number must lie between 16 and 31, so between 172.16. ... . ... and 172.31. ... . .... The network address ends with 0.0
An example: as a network address you choose 172.22.0.0. The DHCP Server can, if set up properly, assign addresses in the range 172.22.0.0 to 172.22.255.255 with exception of the exchange4linux IP-address.
- A-Class network:
There is also one private A-Class network (10.0.0.0). This network range cannot be used with exchange4linux though. exchange4linux’s nameserver is based on advanced "reverse resolving", and when activating a profile which uses this A-Class network an extremely large nameserver database must be built. This can take several hours!
![[Caution]](gfx/caution.png)
Caution: Using official (public) IP-addresses, which are not owned by you, for an internal network is against the rules and regulations described in RFC 1597 - Address Allocation for Private Internets, and we strongly dissuade you not to do this. When using official IP-addresses, which are not assigned to you, for the internal network, the correct functioning of exchange4linux cannot be guaranteed. - Netmask:
The (sub)netmask serves as a display of the network size. The standard values for the netmask are:
for a B-Class network 255.255.0.0
for a C-Class network 255.255.255.0
Alias-addresses:
Alias-addresses are addresses that refer to a mailbox/user. The value of such an alias
is, that multiple names can be appointed to one single mailbox. In case of
exchange4linux an additional advantage is that alias-addresses can be larger than the 16
characters a mailbox may consist of. An example of an alias-address is:
<firstname.surname@company.com>.
This alias-address then refers to the mailbox:
<surname@company.com>.
Autoresponder:
An autoresponder can be used to respond with a standard reply to persons sending a
message to your account, for example in case of a vacation. In this reply you can notify
them of your absence and return date.
Backup Service (Section 6.3):
The Backup Service offers the possibility to save the exchange4linux userdata by means
of an accompanying Windows application. When data has been lost, this application can
restore a previously made back-up.
Default Transport Service (Outlook):
The ‘Default Transport Service‘ is the location where your e-mail is normally
delivered at. This location is also crucial for the method of e-mail transportation. The
Default Transport Service is based on the order in which e-mail accounts are being set
up. When the first account set up in Outlook is an exchange4linux account, this will be
the Default Transport Service. Your e-mail is being saved centrally in the
exchange4linux database and will be sent through the MAPI service of the installed
Outlook Connector.
On the other hand, when a POP3 account is set up first, the e-mail will be sent
through Outlook’s built-in SMTP service. When set up like this, Outlook will make a set
of Personal folders. Incoming POP3 mail will be saved on the client using a .pst file.
DHCP Server (Section 6.10):
A DHCP Server appoints a dynamic IP-address to computers within the network. This
saves a lot of work, since no additional network settings have to be made on the
workstations (IP-address, broadcast, netmst, DNS Servers, etc.).
Domain suffix:
The domain suffix is the internal domain name of the server. In case of fixed
IP-addresses the domain suffix must be inserted into the DNS-searchlist of the clients.
On exchange4linux the standard value of the suffix is "local.intranet".
Email: (Batched) SMTP (Section 6.5):
(Batched) SMTP is a method of receiving e-mail whereby all the e-mail for your domain
is actively pushed to the server. Once the e-mail arrives at the exchange4linux server,
the address of the recipient is checked and if existent the mail is being distributed to
the user. Nowadays most providers make use of this protocol.
Email: POP3 (Section 6.5):
A method which polls the e-mail from the provider using a fixed interval, whereby
messages are being sent to the user’s workstation.
Email: IMAP (Section 6.5):
A method that sends a copy of the actual message to the e-mailclient, but saves one on
the server as well. This implies that, at the cost of more disk space, one can manage
his e-mail using several programs (eg. Outlook, Mozilla and webmail) without removing
messages from the server.
exchange4linux folders (Outlook):
These personal folders are saved on the exchange4linux server and not on the local
computer. By setting permissions you can make folders accessible to certain users.
Caution: Do not mistake these folders for personal folders that
might be present in your Outlook profile and are saved locally as a .pst file.
Fileserver (Section 6.11):
The EasyShare fileserver integrated in exchange4linux offers the possibility to save
files, that can be accessed from any workstation within the network. It is possible to
make exceptions as to which users have access to certain files.
Groupware:
A Groupware application enables users of the network to manage certain data sources
together, eg. an agenda, task list and contacts. exchange4linux Server Suite is among
other things a Groupware solution.
Host:
A host is a PC or server with a certain IP-address.
Maildomain (Section 6.5.1):
This is the domain (eg. company.com) that is being used by the
exchange4linux mailserver. The mailbox names and alias-addresses are all complemented
with the domain name(s) mentioned here.
Manual nameserver entries:
Here combinations of hostname and IP-address can be inserted, to make sure that the
nameserver knows which IP-address matches a certain host. Accordingly the hostname can
be inserted in a user’s browser, after which the correct website will be shown.
Nameserver (Section 6.12):
The nameserver (DNS) is being used to bind URL's (eg. http://www.google.com) to IP-addresses.
exchange4linux has its own DNS server, that works in combination with the provider’s server.
Personal folders (Outlook):
These folders are made automatically by Outlook on the harddisk of the PC on which
Outlook is installed. The data is saved in a file with the extension .pst
PDF Server (Section 6.7):
The Easy PDF Service activates the PDF Server on the exchange4linux Server Suite. This
server enables users to convert documents from every workstation to a PDF file; an
often-used standard for digital documents.
Profiles (Section 6.2):
A profile is a file in which all exchange4linux Server Suite settings at certain point
in time are being saved. When the server does not function properly, it can easily be
restored to a previous state. This is an extremely user-friendly way of configuring,
since changes can be made undone with one click of the mouse. Profiles can also be
imported and exported from and to a workstation. This way your settings can always be
saved eg. when the exchange4linux software is being re-installed.
Public folders (Outlook):
These folders are saved on the exchange4linux server. The data that is being saved in
these folders can be accessed, edited and deleted by other exchange4linux users
(depending on the permissions they have).
Read confirmation:
A read confirmation can accompany outgoing e-mail messages and requests the recipient
to confirm the delivery of the message.
Spamblocker RBL (Section 6.5.2):
A spamblocker filters incoming messages for known distributors of spam (unsolicited
e-mail) before they are being sent to the users. On the internet, databases with these
spam-addresses are continually being updated. exchange4linux consults these databases
and returns known spammail to the sender.
Spamfilter (Section 6.6):
A spamfilter attempts to filter spam (unsolicited e-mail) from all incoming e-mail by
looking at certain characteristics that are often a sign of spammail. Spam is one of the
most hated phenomena on the internet and adds up to a considerable percentage of
worldwide e-mail traffic.
Subdomain:
A specified domain within the normal domain. Most internet providers offer the
possibility to supply you with a subdomain. Subsequently this subdomain can be used for
e-mail addresses and websites. A subdomain looks like this:
department.company.com.
An e-mail address would look like: john@sales.company.com.
WINS Server:
Windows Internet Name Server; a protocol that makes sure that computers within the
network are easily accessible for each other. EasyShare uses this service.
To install and set up exchange4linux you need some information e.g. from your provider. To save time the important points are listed in this part, so you are able to collect them "before you start" the installation respectively the setup
You need to have the following data at hand before configuring exchange4linux.
- License domain:
The domain name must be known when registering. It can be inserted in the "Registration" menu.
- For the e-mail settings you need:
The IP-address of your provider’s SMTP server (to send mail) and the POP3 server (to receive mail). To receive mail using SMTP you do not need to fill in an IP-address in the configuration menu. Normally your provider takes care of this by means of setting up a so-called MX-record.
When using POP3, you also need to know the username and password of the mail account.
- Network data:
In order to place exchange4linux correctly within the network, some data has to be available to you. The following IP-addresses must be required for the configuration of your exchange4linux server:
- Network address and an unused IP-address for the exchange4linux Server Suite
- Broadcast address
- Netmask
- IP-address of the router that connects exchange4linux to the internet
- Monitor
- Keyboard
- PC that satisfies the hardware requirements, including a CD-Rom drive
- Cross-over cable or regular UTP cable
- Free port on the hub or switch
| Caution: |
|---|---|
| It is important to know the brand names and model numbers of the installed Network
Interface Cards (NICs) and ISDN device (if applicable) in advance. This has to be
indicated during the installation procedure. | |
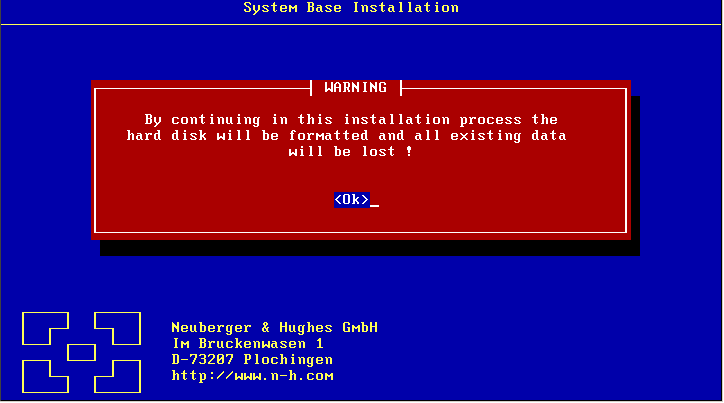
The warning that is being displayed (Figure 4.3) notifies you of the fact that all existing data on the harddisk will be erased during installation. Please be aware of this before starting the factual installation procedure. Also take into account that the PC cannot be used for other purposes as long as exchange4linux is running on it.


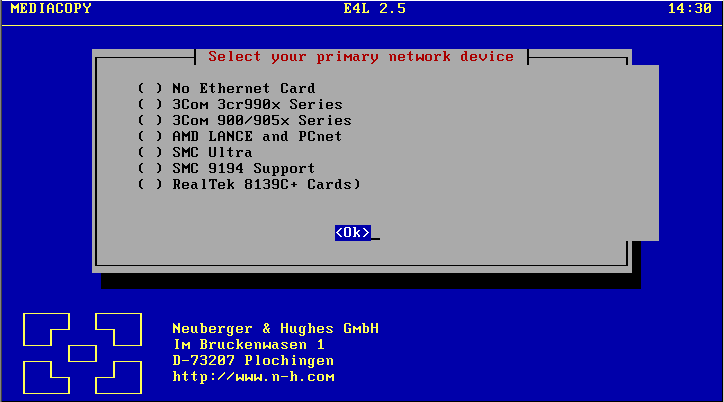
Now the network device must be identified (Figure 4.4). The primary network device is the first Network Interface Card, meant for the communication between the exchange4linux server and the network. This card must be attached to the hub or switch. The second NIC can be attached to an ADSL- or cable modem, if present. Usually this second connection is indirect, since there is often a router or firewall between exchange4linux and the internet. It is also possible to include an ISDN device for two possible reasons: as a back-up solution for the regular connection method; or to make use of the integrated faxserver. For more information on supported devices, please consult the Hardware Compatibility List on the exchange4linux website. Note that in order to use exchange4linux as a faxserver, a so-called active ISDN device is required.
Subsequently the desired language of the system can be selected. If desired, the language settings can always be altered in the exchange4linux configuration menu. Now remove the cd from the CD-Rom tray and press Enter to reboot the system.
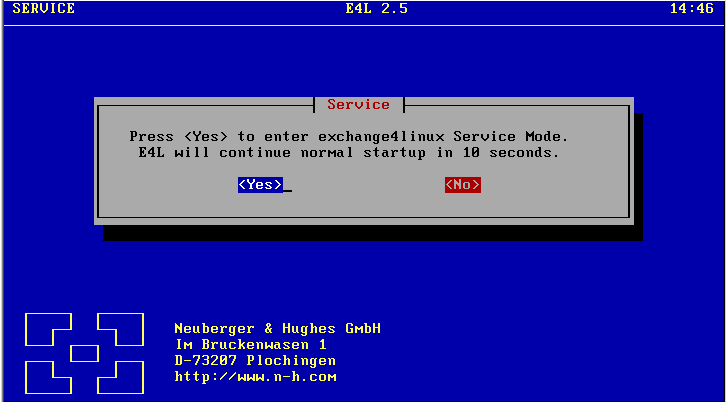
When starting the system, a dialog like Figure 4.5 is being displayed. The “Service Mode” is meant to offer a way of repairing the system when it no longer functions properly. Normally you will not need this.
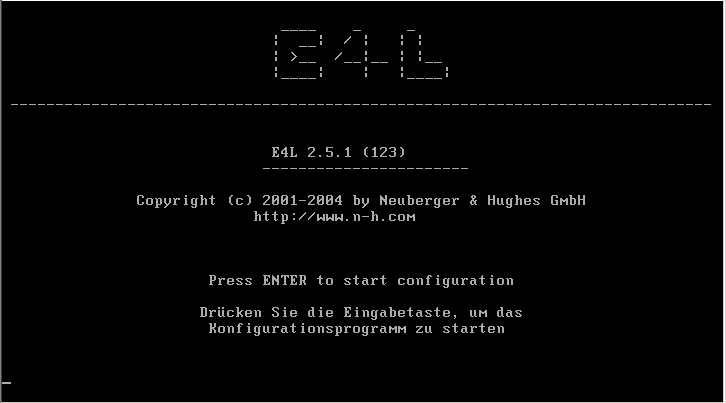
After a short while the start-up procedure is finished and the screen looks like Figure 4.6. Now exchange4linux is ready to be configured from a workstation by using a cross-over cable or through the hub. In both cases make sure that the network cable is attached to the internal/primary network device of your exchange4linux server. You can then access the configuration menu by locating http://exchange4linux or http://172.16.6.1 in a webbrowser on the attached PC or on a regular PC within the network (depending on whether a cross-over or regular cable is used).
Alternatively some basic settings can be made directly on the console. To do this, click Enter to configure the network. Log in with username admin and password exchange4linux. By making the correct network settings here, exchange4linux will be visible within the network and can be configured from a random workstation within the network. After saving the new settings, do not forget to reboot the system by simultaneously pressing the Control, Alt and Delete buttons.
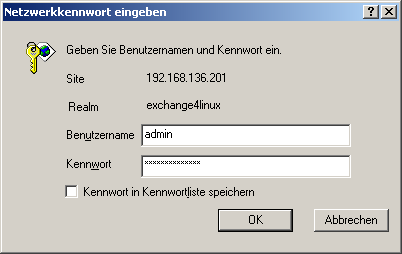
The system will reboot and when the primary network device is attached to the hub, the configuration menu can be reached by browsing to http://<ip-address> with a webbrowser. Again, log in with the combination:
username:
admin
password:
exchange4linux
| Caution: |
|---|---|
When, after changing the configuration, exchange4linux does not start up properly, the previous profile can be re-activated by means of the Service Mode. To do this, attach a keyboard and monitor to the system and wait until the Service Mode notification appears (Figure 5.1). | |
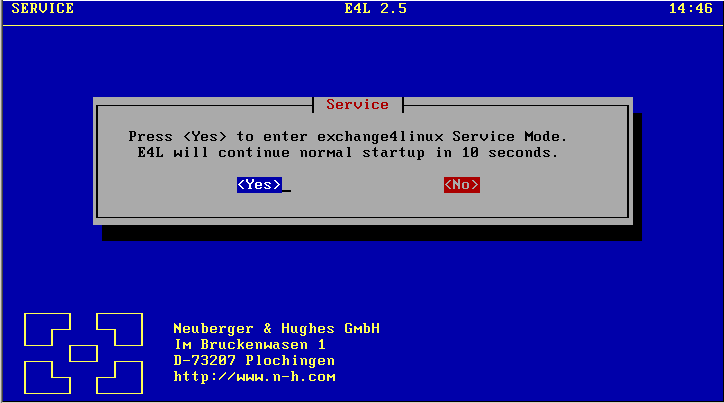
Now make sure that Yes is highlighted and press Enter.
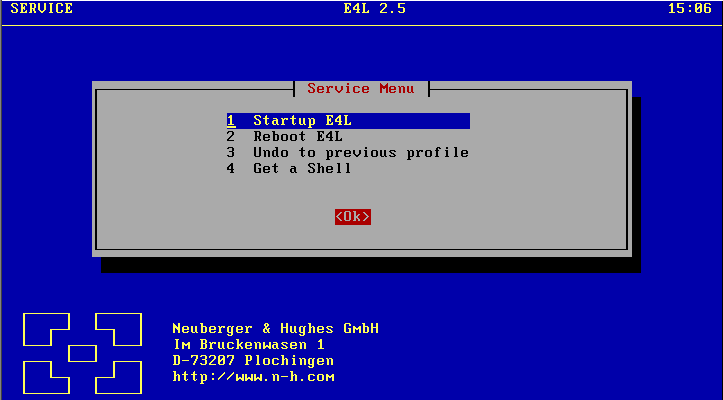
In the Service Menu choose the option: Undo to previous profile. Now exchange4linux will reboot with the previous profile activated.
This part describes how to configurate exchange4linux correctly and how to manage the offered possibilities. The amount of shown options depends on your exchange4linux version, so it is possible that some points described in here do not appear in your version.
When you have bought or downloaded the exchange4linux software, please consult Chapter 4 Software installation first. After that, this section will explain how to configure the software.
To buy or register the software (in case of an evaluation version) please contact your nearest exchange4linux reseller, distributor, or Neuberger & Hughes directly.
software only
standard slimline server
Professional tower server
19" slimline rackmount model (1 unit / 1U)
19" rackmount model of 2 or more units (2U and up)
The product complies with the usual standards for electronic devices. Please make sure that the location satisfies the following requirements:
- There must be a grounding contact near the exchange4linux server
- The room/location must be clean, dry and dust-free
- The room/location must be well ventilated and the exchange4linux server
should not be placed near heat-sources (including direct sunlight)
- There should not be strong electromagnetic fields (appliances with large
electronic engines, air-conditioners, radios, televisions or high frequency
alarm systems) nearby; such devices can adversely affect the functionality
and durability of your hardware
- The connection to the Local Area Network (LAN) must be sufficiently close
to the exchange4linux server
Alternately, you can connect a PC directly to the exchange4linux server by making use of a cross-over (or null-Ethernet) cable.
| Caution: |
|---|---|
| A null-Ethernet cable is not the same as an ordinary UTP network cable. If you
do not have a cross-over cable, the workstation and exchange4linux can be
connected through a single network hub. | |
It is also possible to use another browser, eg. Mozilla, on the condition that a recent version is being used. For problem-free communication the TCP/IP protocol must be installed and set up correctly on every workstation.
- Configuring from a client:
- http://exchange4linux or
- http://172.16.6.1
Caution This only works if your network is set up to use dynamic IP-addresses and there is no DHCP-server active at present, or if you already have a network with network address 172.16.0.0 and netmask 255.255.0.0
Furthermore the IP-address 172.16.6.1 may not be in use !! Please make sure that the client with which you are attempting to make a connection has an IP-address that falls within the network. - http://exchange4linux or
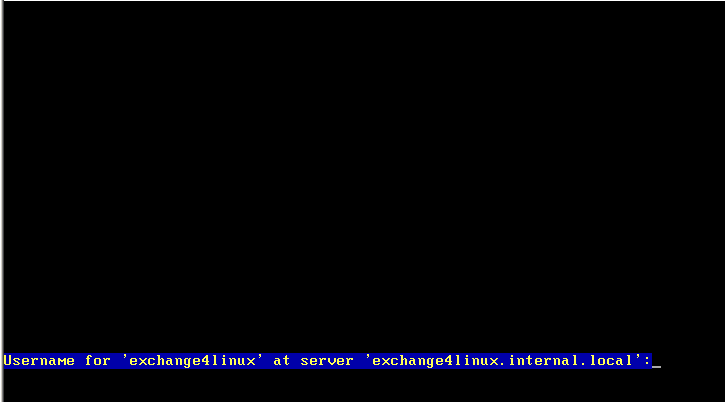
- Network configuration from the console: After starting the
exchange4linux system, the following screen will appear (Figure 6.1):
If you press Enter, the following message will appear:
Alert!: access without authorization denied – retryingAfter a few seconds you will see:
Username for "exchange4linux" at server "exchange4linux":Here you insert:
adminThen you will see:
PasswordHere you insert:
exchange4linux
(The login screen is case sensitive, so make sure the <CAPS LOCK> key is not activated.)
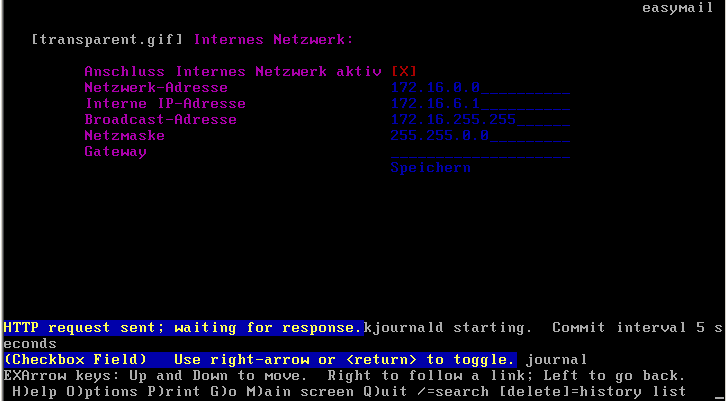
Once successfully authenticated, you will see a menu where you can modify the exchange4linux network settings in order to reach it over the network. You can navigate between the different lines with the <UP>, <DOWN> and <TAB> keys.![[Warning]](gfx/warning.png)
Warning It is advisable to only change the network data when you have a clear understanding of TCP/IP networks and when you know exactly what to insert. Incorrect settings can lead to a malfunctioning system.
Once the settings are correctly modified, go to the line that says:
SaveNow press:
ENTERNow the following text appears:
Beware: The configuration has changed. You have to reboot EasyGate to activate the configuration.Using the <TAB>-key, go to the line that says:
Save and press ENTER
Now simulataneously press SHIFT and Q to leave the configuration menu.Finally press the CTRL, ALT and DELETE keys simultaneously to reboot the exchange4linux server. After several minutes the start-up screen appears. Now the server can be connected to the network and the configuration menu can be reached by entering the following location in an internet browser on a workstation:Caution The command SHIFT-Q only function when the cursor is at the Save line.
http://<exchange4linux IP-address>

| Caution: |
|---|---|
| It is advised to change the password immediately after the first log-on. How
to change a password is explained further on in this manual. Make sure that the
a possible alteration of the password is documented correctly, as it is not
possible to give support when the admin password is unknown! | |


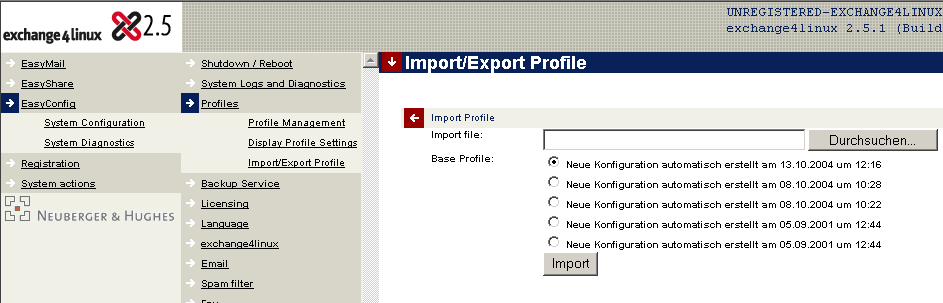
After clicking Profile management, a list with the existing configuration will be displayed. The profiles are sorted on date, with the most recent profile on top. This can be the activated profile (to be recognized by the green status description) or the new profile when changes have been made to the configuration after the last reboot (a red status description). Every profile shows the date and time of its latest alteration. Old profiles do not have a status description.

A profile can be copied in two ways:
Click the arrow-button to the left of the Profiles header, select a reference profile from the list and enter a title for its copy. Now press Save and a copy of the profile will be made.
Select a profile by clicking on the arrow left of its name. Rename it and click Save.
testprofiel-3-januari.emc
Use the .emc extension, so that exported profiles can easily be recognized in the future.
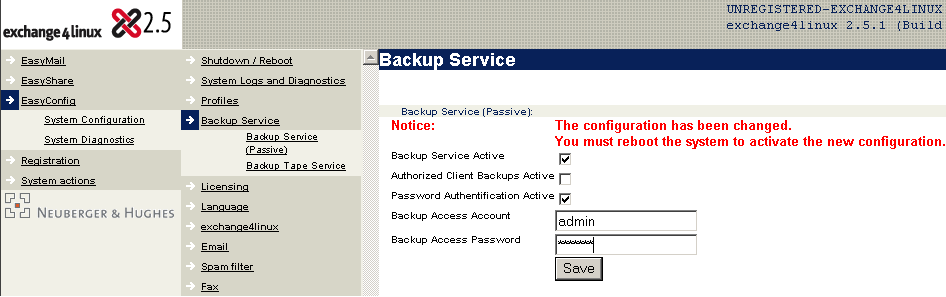
Authorized Client Backups Active:
With this option selected, a backup can only be made from (a) certain
IP-address(es). Fill in one or more IP-address in the fields that appear, and
save the settings by clicking Save.
Password Authentification Active:
When checked, a password authentication mechanism can be activated to make
sure that only certain individuals can make and restore backups.
The Backup Service can be controlled with the Windows application easygate.exe. This application can be downloaded from the exchange4linux website (see Section 6.3.3).
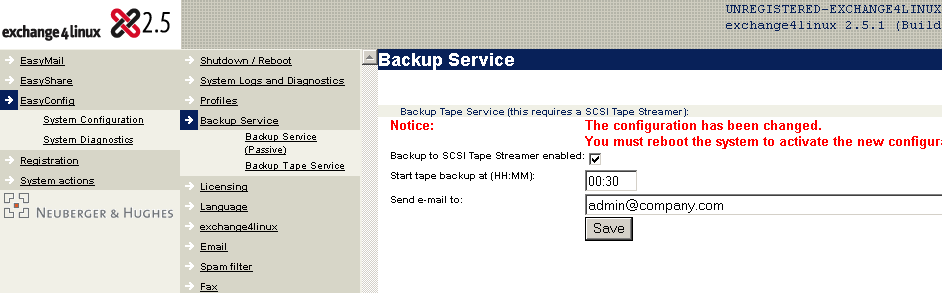
exchange4linux works with nearly every SCSI tape streamer, as long as it is connected to a SCSI-controller that is being supported by exchange4linux. For more information see the Hardware Compatibility List, which can be found on the exchange4linux website.
The starting time of the daily backup procedure can be entered here, as well as the e-mail address that receives a confirmation of each successful backup.
Making and restoring a backup:
Make a new directory where the backup must be saved. This can be both locally
and on a network drive. Be aware of the fact that a backup can amount up to
several gigabytes in diskspace, especially when IMAP mail is being used.
| Caution: |
|---|---|
| easygate.exe does not take free diskspace into account. Before starting a
backup-task, make sure that there is enough free space on the harddisk where the
backup files are to be saved on. | |
Normally this part is already filled in by your exchange4linux reseller or distributor. When this is not the case, or when you have questions on this matter, please contact your nearest exchange4linux registration-center.

At least the following data must be present:
License domain:
your (main) domain (companyname.com)Registration server:
reg.n-h.com
Service center ID:
nhnocVAR/Reseller ID:
nh
After filling in the necessary data, click Save. When the server reboots, the registration data will be activated. When the registration is completed successfully, your domain name will be visible on top of the configuration menu.
| Caution: |
|---|---|
|
the "timezone" of your exchange4linux will be activated during the online registration.
| |
exchange4linux registration-center Germany:
Neuberger&Hughes
Im Bruckenwasen 1
73207 Plochingen
Germany
phone: +49 - (0)7153 6120-0
fax: +49 - (0)7153 6120-33
mail: info@n-h.net
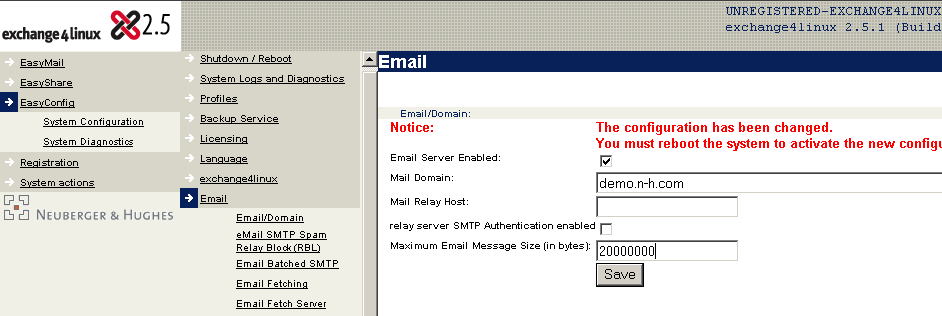
Email server enabled:
This is where you can activate exchange4linux’ Email server functionality. It
is the main switch, which has to be activated at all times. If you remove the
check, mail will NOT be sent or received. This should only be
used to temporarily disable the mailserver on exchange4linux.
Mail domain:
This is the name of the mail domain. This is usually the domain-name, for
instance YourCompany.com, sometimes with a subdomain in
front of it (e.g. marketing.YourCompany.com). Your provider
usually supplies you with this information.
Mail relay host:
Here the mailhost of your provider must be filled in (usually something like
smtp.provider.nl). Your provider usually supplies you with
this information. When exchange4linux has to function as mail relay host itself
(which we usually recommend), this field needs to remain empty. This is only
advised for permanent internet connections.
| Caution: |
|---|---|
| It is strongly recommended to always use the hostname of the mail relay server
instead of its IP-address, since providers sometimes change the underlying
IP-addresses of hostnames without warning you in advance. This causes
exchange4linux to attempt to connect to a non-existing IP-address. | |
Relay server SMTP authentication enabled:
When the provider uses SMTP authentication, this option needs to be checked.
Relay server SMTP authentication user id:
Here you fill in the username that has been supplied to you as SMTP
authentication. Consult your internet provider when this value is unknown.
Relay server SMTP authentication password:
Fill in the corresponding password here.
Maximum Email message size (in bytes):
Use this field to limit the size of all incoming and outgoing mail, both
internal and external. Please pay attention to the fact that an attachment
causes its message to become about 1.4 times the size of this attachment. For
example, email with a 5 MB attachment will be 7 MB in size.

This function only needs to be activated when the provider expects a so-called ETRN-command before the mail is being sent. Some providers automatically send the mail as soon as exchange4linux has connected. When in doubt, ask your provider.
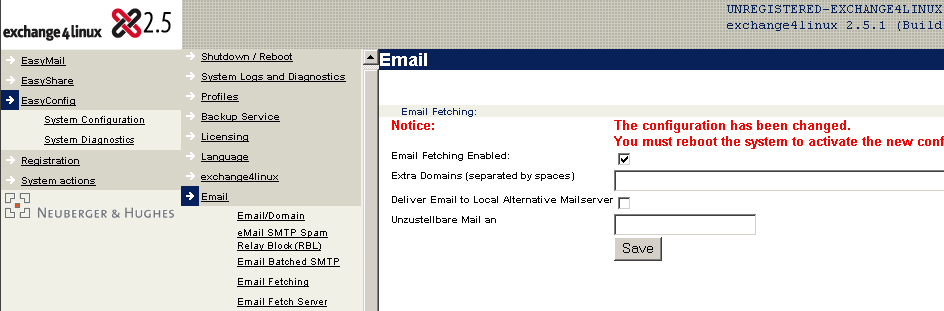
Email fetching enabled:
Here you can (de)activate the Email fetching scheme. If you deactivate Email
fetching, mail will not be sent and retrieved anymore. However, mail will be
sent and retrieved when there is an internet connection. Usually this function
should be activated.
Extra domains (separated by spaces):
This is where extra domains can be inserted, for which exchange4linux should
accept incoming Email. For example, besides YourCompany.com
there is also YourBrandname.com. Multiple entries have to
be separated by a space.
Deliver Email to local alternative mailserver:
When mail is NOT retrieved by SMTP, but by multidrop POP3, it can be forwarded
to another mailserver. When this box is checked (and after clicking
Save), a new field is created where you can enter the
IP-address of the alternative mail server. This function does not work
with (batched) SMTP! Since batched SMTP is the most often used
method of Email delivery, this function is obsolete in most cases.
Forward Undeliverable Email to:
This setting only works when the Email is fetched by means of multidrop POP3.
If you use batched SMTP, this setting will not have any
effect. Undeliverable Email will be, in case of SMTP, returned to the
sender with the error message User unknown.
When mail is being fetched with (multidrop) POP3:
An existing mailbox-name has to be entered here. All mail that exchange4linux
cannot deliver because the local recipient is not a valid user will be routed to
this mailbox. This happens when someone makes a typing-error in the e-mail
address. For instance: an email is sent to
boob@yourcompany.com. Within exchange4linux this address is
unknown. However, there is a user called
bob@yourcompany.com. This way the message will arrive and
the user who checks this mailbox can forward the mail to the intended recipient.
In general this setting makes sure that all mail for your domain, that is all
mail sent to a user @yourcompany.com will arrive. Normally
admin is the desired recipient for undeliverable messages.
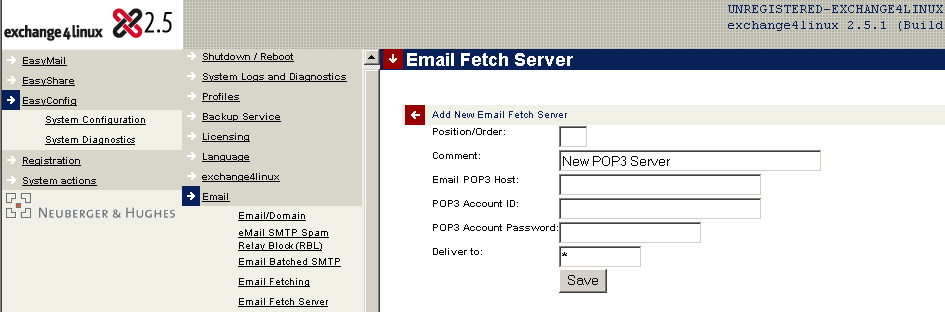
Add new Email fetch server:
In this section you can select from which POP3 servers the mail has to be
retrieved. This is only necessary when you do not use batched SMTP.
Also other servers can be entered here. For instance, the mailserver of an
already present mail subscription. The setting can be altered (click on the
arrow pointing to the right) or a new server can be added (click on the arrow
pointing downwards).
Position/order:
This is the rank the server in question has. If there are multiple servers,
you can decide on the sequence of connections to the different mailservers (more
important servers could be checked first).
Comment:
A description can be entered here. This will appear under the server-name in
the server-list. For instance POP3 at providername.
Email POP3 host:
This is the mailhost-name of the provider. Normally your provider has given
this information to you. In general the value resembles pop3.provider.com
Email POP3 username:
This is the username of the e-mail account. Often (though not always) it is
the same as the access-account username.
Email POP3 password:
The password that corresponds to the POP3 account mentioned above.
Forward to:
Here you can indicate which email address the emails need to be forwarded to.
This field generally is set to wildcard (“*”). It makes sure that messages are
delivered at the recipient that the sender addressed the message to. If a
mailbox-name is filled in here, all mail will be sent to this mailbox,
regardless of the intended recipient. This is useful if mails need to be fetched
from an old e-mail account or e-mail domain, and all of these messages need to
be sent to another mailbox (like OldMailDomain@YourCompany.com)
| Caution: |
|---|---|
| The wildcard-setting can only be used in combination with a multidrop
POP3-account. Your provider can inform you on this matter. | |
The setup possibilities in this part are the most general parameters, that is, they have the highest priority in the determining of the connection behavior of exchange4linux.
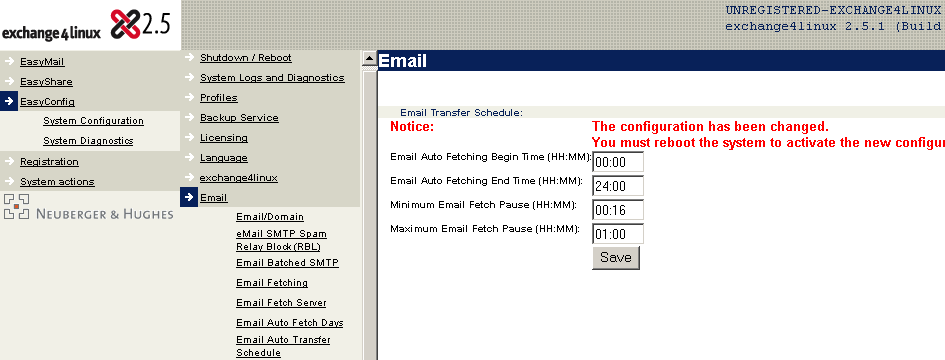
Email transfer start time:
Start time for the mail-transport. For instance, it could be set to half an
hour before the normal starting time of the users. This way, Email has already
been fetched by the time users want to read it.
Email transfer end time:
End time for the mail-transport. Please be aware of the fact that after this
time no more mail is being sent and received. When employees often work late, a
sensible time like 20:00 can be filled in here.
Minimum Email Transfer Pause:
This is the minimum time that must pass before a new connection is initiated
again. With this setting, the number of connections made can be limited. There
would be unnecessary costs incurred if every 5 minutes a new connection is made
because there is another message in the send queue. A sensible value is between
15 and 30 minutes for an ISDN connection. This parameter works in conjunction
with the settings in the following paragraph. Note that for a flat-fee connection the values entered
here can be much more strict.
Maximum Email Transfer Pause:
This is the maximum time that will elapse before a new connection is initiated
again. A sensible value is between 30 and 60 minutes for an ISDN connection.
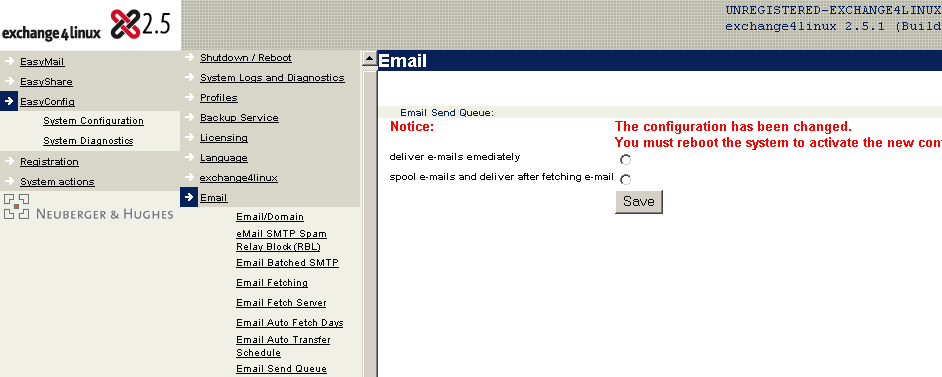
Deliver Email immediately:
A new e-mail message delivered to exchange4linux will be sent immediately.
When you have a flat-fee internet connection, like ADSL, this is the recommended
method since there is a minimal delay between sending and receiving mail.
Save messages and deliver them after fetching Email:
With this method checked, exchange4linux will send Email according to the
settings made in the menu "auto fetch days" (Section 6.5.6) and "auto transfer
schedule" (Section 6.5.7). This method saves connection costs when ISDN is being
used, since there will not be made an internet connection for every e-mail message.
| Caution: |
|---|---|
| These settings are only relevant when you have a special callback account.
Since only few providers grant this service, chances are small that you have to
fill in anything here. | |
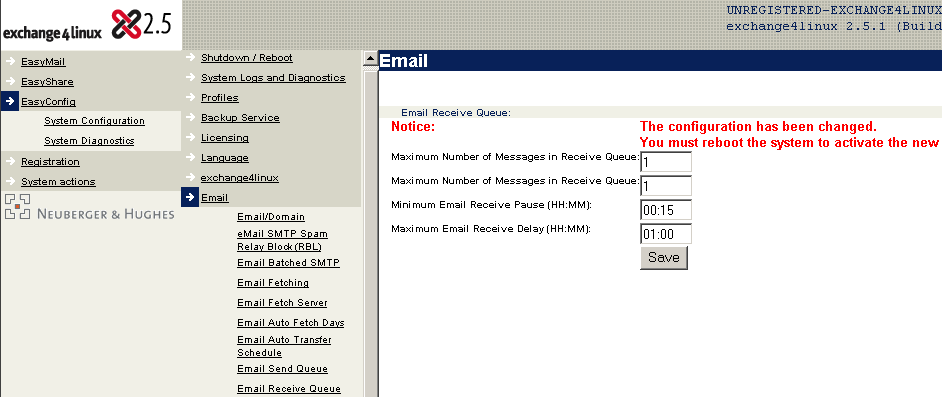

Delay after connection error:
If errors should occur while making a connection, then this time must elapse
before trying to connect again. This prevents immediate attempts to reconnect
after a failed connection.
Email check send queue after send error delay:
The period of time that elapses after there has been a connection-error with a
transfer action. A logical value is somewhere between the settings minimum and
maximum Email transfer-pause. The send queue is checked for not yet delivered
mail. A connection is only made when mail to be sent is queued.
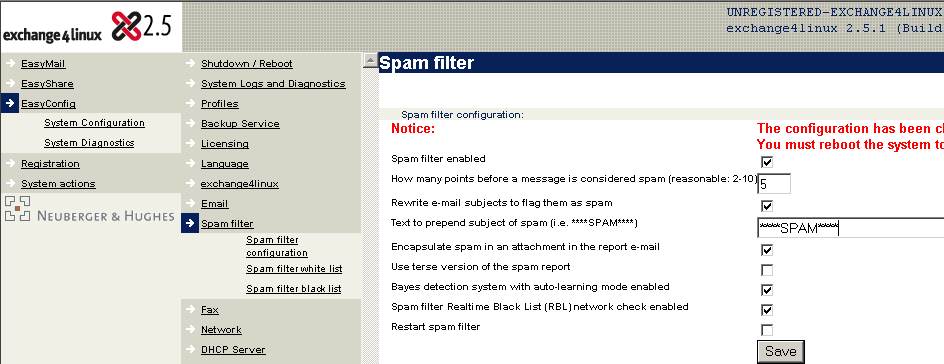
Spamfilter enabled:
The spamfilter can be (de)activated here.
How many points before a message is considered spam:
The score system decides when a messages is considered to be spam, based on
several characteristics of spammail. The lower the value set here, the higher
the risk of getting false positives: messages marked as
spam while they are actually not. A value of 5 usually results in very few false
positives, while most of the spammail is being filtered out.
Rewrite e-mail subjects to flag them as spam:
When a message is marked as spam, its subject can be changed by putting a
common text in front of it. Fill in this subject in the field that appears when
this option is checked. Due to this common subject line, a user can easily
discover spammail in its mailbox.
Encapsulate spam in an attachment in the report e-mail:
The original spammessage can be included as an attachment with the report that
will be sent to the recipient. The report includes information on the
distributor of the message and the reason for marking the message as spam.
Use terse version of the spam report:
Select this option to send just a minor report to the recipient of the spammessage.
Bayes detection system with auto-learning mode enabled:
The Bayes selection system is a complex method that nuances the before
mentioned score when deciding on the status of each individual message. This is
being done by looking at messages that a user received in the past and by using
a special weighing system to decide on the possibility of a message being spam.
It is advised to activate this setting, since it further decreases the risk of
false positives while spam is recognized better.
Spam filter Real-time Black List (RBL) network check enabled:
With this option enabled the spamfilter checks the sender of a message by
using several on-line blacklists. These databases contain extensive information
on networks and mailservers that distribute spam. As soon as a message
originates from such a server points are added to the score of the message, so
that it might be considered spammail.
Restart spamfilter:
When changes have been made to the configuration of the spamfilter, it can be
restarted without having to reboot the exchange4linux server. Just check this
option and click Save. Note that due to a changed profile,
there will still be a notification that the system must be rebooted in order to
activate the new profile.

Spamfilter enabled:
Always leave this option checked, unless you want to disable the spamfilter completely.
Spamfilter whitelist enabled:
This option (de)activates the whitelist as described above.
Spamfilter whitelist:
Add e-mail addresses and domains here to make sure that their messages will
not be marked as spam.
| Caution: |
|---|---|
| insert every entry on a new line. A domain must be defined
*@domein.com, an e-mail address must be inserted completely. | |
Restart spamfilter:
Use this option to restart the spamfilter directly after changes have been
made to its configuration.

Spamfilter enabled:
Always leave this option checked, unless you want to disable the spamfilter completely.
Spamfilter blacklist enabled:
This option (de)activates the blacklist as described above.
Spamfilter blacklist:
Add e-mail addresses and domains here to make sure that their messages will
always be marked as spam.
| Caution: |
|---|---|
| insert every entry in a new line. A domain must be defined
*@domein.com, an e-mail address must be inserted completely. | |
When there is no template available the document will be made, without further error messages, with a blank background.
A template can be configured in the following way:

- Log onto a workstation as Administrator.
- Add the printer mkbg-PDFsecretarius as described in
Section 8.3
- Design, for example in Microsoft Word, the template. Save the file as
PDF-layout<1-5>.doc (instead of
<1-5> fill in an unused number between 1 and 5; the extension
is irrelevant, since it is removed automatically). The resulting printer
template will be named eg. PDF-layout3-PDFsecretarius. Take
into account that the filenames are case-sensitive.
- Add, again as described in Section 8.3, the newly created template as a
printer.
Incoming faxes are sent by default to the mailbox fax. Another recipient can be chosen by means of the menu EasyMail - Forwardings.
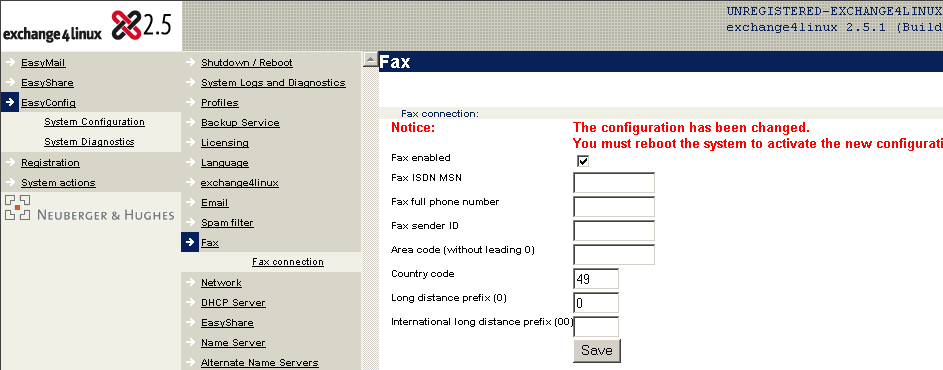
Fax enabled:
Check this box to enable the faxserver.
MSN:
Fill in the MSN number (without 0) which will be used to send and receive fax
messages. As soon as a fax call is made to this MSN number, exchange4linux will
accept the incoming connection.
Full fax number:
This number will be attached to every outgoing fax message.
Fax sender ID:
The value filled in here will also accompany an outgoing fax message and will
appear on the LCD screen of the recipient’s fax machine.
Area code (without 0):
Insert the area code (without 0).
Country code:
Insert the country code here, eg. for The Netherlands 31 and for Germany 49.
Interlocal prefix:
The prefix that is placed in front of an interlocal number, usually a 0.
International prefix:
The prefix that is placed in front of an international number, usually 00.
| Caution: |
|---|---|
|
Make sure that the address range you allow the DHCP-server to choose
from (see Chapter 7) falls within the network that is defined here. A
wrong entry can lead to a non-operating network, so it is important to pay
attention what you enter here.
| |
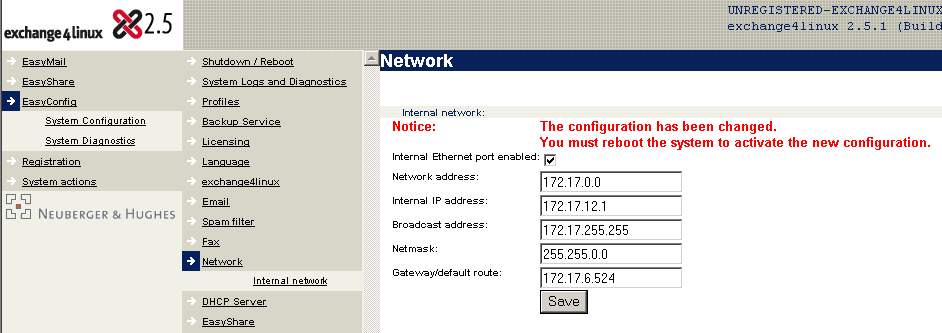
Internal Ethernet port enabled:
This is where you (de)activate the connection to the internal network.
Normally this item should be activated.
Network address:
This is where the base-address of your network should be inserted. Do not fill
in a subnet address. When the internal network is a subnet, then fill in the
C-class or B-class network address that lies above it and add the subnet address
to the menu item Name Server - Name server settings - Alternative Name
server network address.
| Important: |
|---|---|
|
Fill in a network address from one of the private ranges. Don’t use
the 10.0.0.0 A-class network. Obviously it is not allowed to use another
A-class network, since the remaining A-class networks are reserved official
IP-ranges.
| |
Internal IP-address:
The IP-address that is to be used by exchange4linux.
Broadcast address:
The broadcast address of the network. This address should always end on .255
with a C-class network and on .255.255 in case of a B-class network. When an
alternative IP-range is being used (eg. in case of subnetting), there should
still be a C-class or B-class broadcast address. The correct broadcast address
can now be added to the menu item Name Server - Name server settings -
Alternative Name server network address.
Netmask:
The netmask of the network. It usually ends on .0 with a C-class network and
on .0.0 with a B-class network. However, this is not always true: In case of
subnetting there should still be a C-class or B-class netmask. The correct
netmask can now be added to the menu item Name Server - Name server
settings - Alternative Name server network address.
Gateway/default route:
Fill in the gateway here. This can be an internal router, but also a DSL- or cable-modem/router.
| Caution: |
|---|---|
| When using ADSL by KPN (before Mxstream) in The Netherlands, this field MUST
remain empty. | |

DHCP server activated:
Here the dynamic assignment of IP-addresses can be (de)activated. This
function needs to be deactivated only if all computers in the
network have a fixed IP-address.
When there is already a DHCP server active in your network, some settings of
the exchange4linux server have to be added to its configuration. For DHCP this
implies the values for default route/gateway, internal domain and Name server
(if applicable also the WINS server). In this case the exchange4linux DHCP
server can safely be disabled.
| Caution: |
|---|---|
| The following settings have to comply with the configuration of the internal
network and with your general network configuration. Incorrect entries can lead
to a non-functioning network. | |
DHCP IP Pool Start Address:
First IP-address of the pool from which addresses will be assigned
dynamically.
DHCP IP Pool End Address:
Last IP-address of the pool from which addresses will be assigned dynamically.
Default Lease Time (HH:MM):
This is the default lease time for a dynamically assigned IP-address. You can
leave this setting unaltered. Change it only in special situations.
Max Lease Time (HH:MM):
This is the maximum lease time of a dynamically assigned IP-address. You can
leave this setting unaltered. Change it only in special situations.
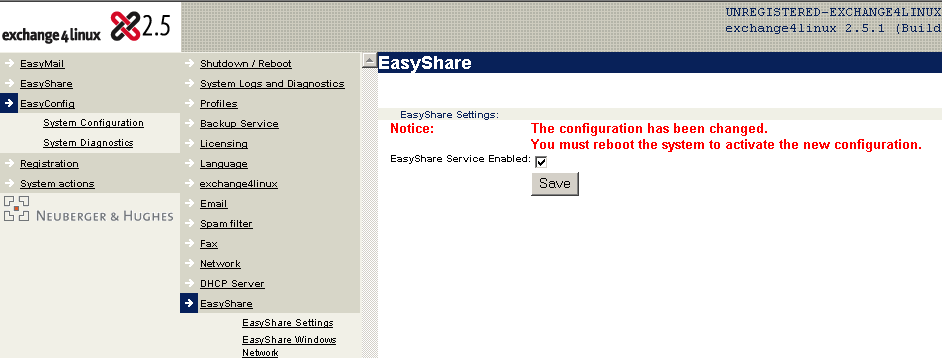
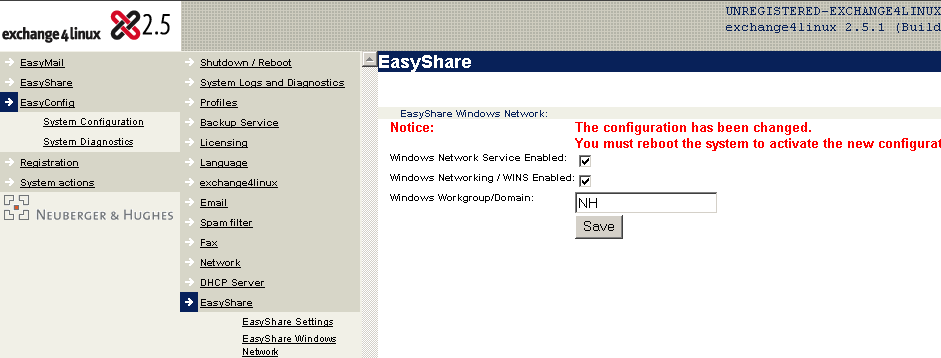
EasyShare Service Enabled:
This setting (de)activates the exchange4linux fileserver functionality. When
it is deactivated, the fileserver is shut down and it will no longer be possible
to reach its fileshares.
| Caution: |
|---|---|
| To make use of the Windows network services, users of EasyShare need to log
onto the network with their exchange4linux mailbox-name and password. When this
is not the case, a connection to the fileshares is not possible from a Windows
workstation. Therefore it is advised to use the same log-in for both the network
and the exchange4linux server. | |
Windows network service Enabled:
When activated, access to EasyShare files and folders is possible from Windows
PCs (when the user has got access rights). For example, one can connect to the
fileshares by means of attaching a network drive letter to them within the
Windows Explorer.
Windows WINS Enabled:
With this function activated, the Windows Internet Name Service (WINS) will be
used. This is necessary when no other WINS server is active within the network
and users wish to connect to the exchange4linux network shares. By default WINS
is activated. When there is already a WINS server present within the network, it
is advised to disable this function on exchange4linux. Do keep in mind to make a
manual entry in the existing WINS server with the IP-address of exchange4linux.
Windows Workgroup/domain:
Here the workgroup name that has been defined in the Network Neighborhood of
Windows NT/95/98/2000/XP can be filled in. The exchange4linux server will then
be visible within this workgroup. Alternatively the name of the NT-domain can be
filled in.
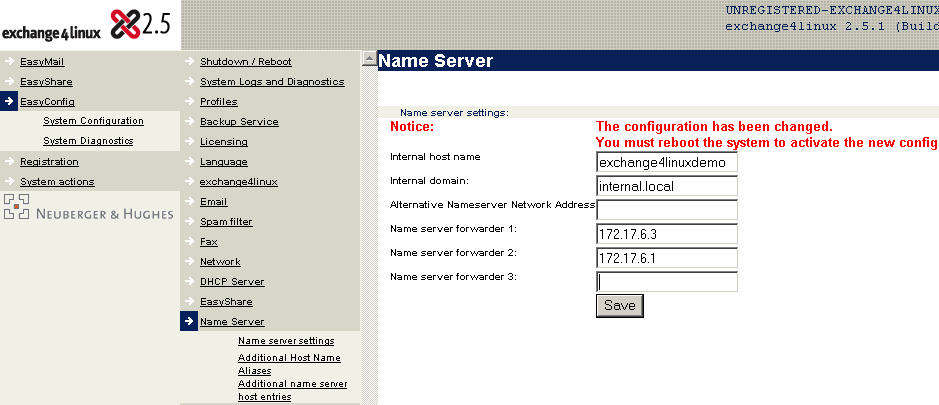
Internal host name:
Define the internal hostname of exchange4linux here. By default it is set to
exchange4linux. Normally you do not have to change this value.
Internal domain:
The internal domain suffix must be filled in here. When there is not yet an
internal domain suffix in use, it is advised not to change this value.
In case of Apple users the suffix must include a . (dot), eg. local.intranet.
This is the domain suffix that, in case of fixed IP-addresses, must be inserted
in the DNS searchlist of the workstations. By default it is set to local.intranet.
Alternative Name server network address:
In special cases you can enter an alternative network address here. This could
be necessary in case of a WAN configuration. The result is that exchange4linux
will build a Name server for the network defined here instead of for the network
defined at Internal network. This way, one can make sure
that a B-class network Name server is being built, while a C-class network has
been configured.
Name server forwarder 1,2,3:
When this function is activated, up to three IP-addresses of other name
servers can be included, which will be queried respectively. Usually the name
servers of the ISP are filled in here. At least 2 IP-addresses have to be filled
in, which have been supplied to you by your provider.


| Caution |
|---|---|
| When a Name server is filled in here, the IP-address of exchange4linux
MUST be added to it as well, otherwise the internal hostname
lookups will not function properly. | |

On the left the menu is visible, where you can select menu items by clicking on them with a mouse-click. In the upper right hand corner the title bar can be seen, where the name of the selected menu item appears. Beneath the title bar is the main window, in which relevant information from the selected menu item is displayed.

When the necessary data has been provided, click the Save button. As soon as an invalid entry has been made or an obligatory field has been left empty, you are informed of this by means of an error message and a red italic text which is displayed on top of the menu item. Depending on the field, an indication of what went wrong is also included.
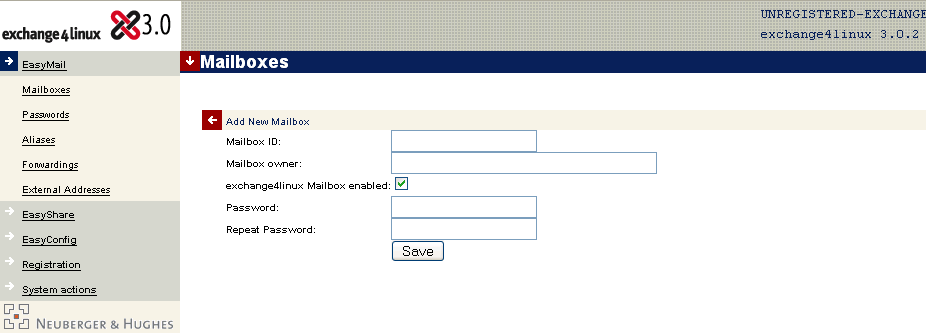

Field name | Contents | Remarks |
|---|---|---|
Mailbox ID | This is the name with which the user logs onto his e-mail application. This is also the address at which the user will receive e-mail. Normally this is the user’s surname or initials. | Fill in the text that is in front of the @-sign. It should contain at most 16 characters and must be made up of alphanumeric symbols only. |
Mailbox owner | The full name / description of the mailbox owner. | It is allowed to use spaces and other symbols here. |
exchange4linux mailbox enabled | Check to give the user access to Public folders within exchange4linux. | This way the user is given the right to access eg. shared address books, notes, etc. |
e-mail delivery to the e4l server | Check to allow the user to send and receive e-mail through exchange4linux. | When Microsoft Outlook is used for sending and receiving e-mail this option can be checked. |
e-mail delivery to the POP3/IMAP/ webmail server | Check to let the user send and receive e-mail in an alternative way. Obviously it will still be managed by the exchange4linux server. | This is often a better way of processing e-mail, since it is faster and requires less CPU capacity. |
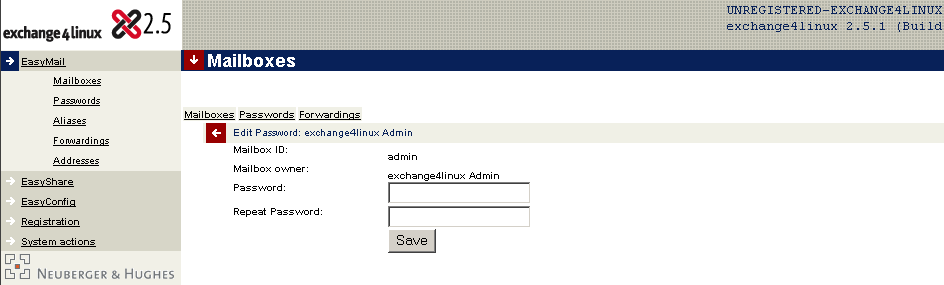
Password | Mailbox access password. This is also used for the e-mail application. | The entered data is displayed in asterix’s for security reasons. |
Repeat password | To prevent mistakes, the password has to be entered twice. |
| Caution: |
|---|---|
| In all cases mentioned above, e-mail will be sent and received through the
exchange4linux server. The difference is based on the protocol being used:
exchange4linux or POP3/IMAP. More information on this theme can be found in
the explanation of the terminology (Chapter 2) and in Section 9.2. | |
| Caution: |
|---|---|
| The mailbox ID cannot be changed afterwards! | |
name.surname@company.com
This alias then refers to the mailbox that has eg. the user’s surname or the initials as its ID.
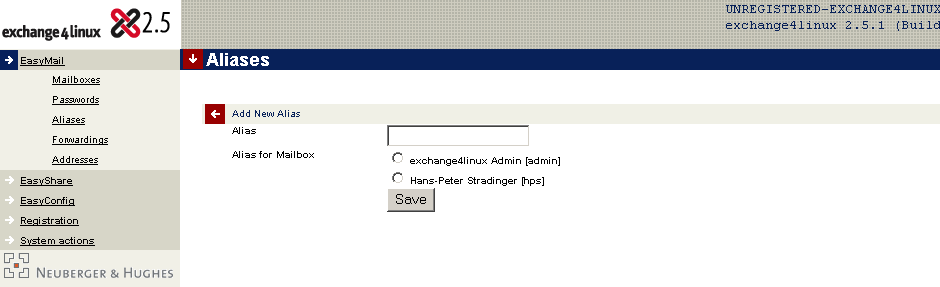
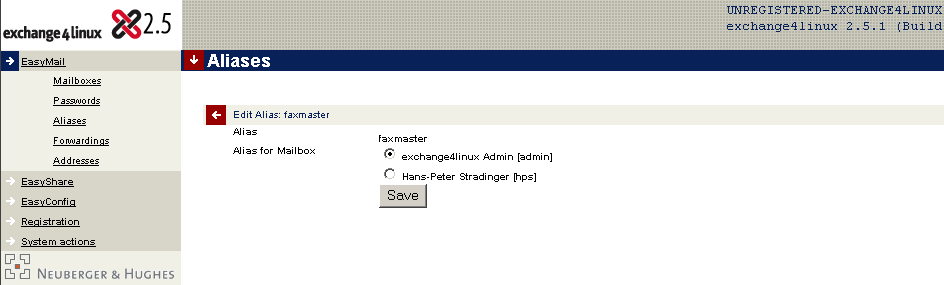
To create a new alias, one needs to log-in as admin, browse to the menu point Mailboxes - Aliases and click on the arrow on the left of the title bar (Figure 7.9). Now an empty form appears. Use the following guidelines when filling in the required data.
Field name | Contents | Remarks |
|---|---|---|
Alias | This is the alias that can be used to send and receive e-mail. | Only fill in the part in front of the @-sign |
Alias for mailbox | All the available mailboxes are listed here (so no other aliases) with a checkbox in front. | By default only one mailbox can be selected. Selecting a mailbox is obligatory. |
incoming mail for a certain user will be forwarded automatically to another mailbox
incoming mail for a certain user will be distributed automatically to several other mailboxes
set up an autoresponder

The second functionality, mail distribution, offers the possibility to maintain distribution lists. Often used distribution addresses are info, sales, helpdesk and general. These addresses can then be forwarded to the relevant employees within the firm. One e-mail message now suffices to reach an entire workgroup, department or the whole firm.
In the menu point edit forward (reached by clicking on the arrow in front of an existing forward or by clicking on the new forward arrow) the mailboxes (both internal and external) that have to receive the forwarded e-mail must be selected by clicking the checkboxes in front of them.
If the mailbox itself is not read/emptied by someone (i.e. if the mailbox alias marketing is simply being used to distribute mail to everyone in marketing and not actually being polled by anyone), then the checkbox next to this mailbox name should be cleared. It is obligatory to check at lease one mailbox: when mail is not forwarded this implies that the mailbox itself is checked by default.
The third functionality, autoresponder, can be used to send an automatically generated reply to those who send you e-mail during your absence. In this reply they can be notified of your absence. The function can be activated by clicking the relevant checkbox in the forward dialog (Figure 7.11). It is possible to change the subject of the message that will be replied with and the text it contains. The autoresponder keeps track of who sends e-mail, so that it can reply with a certain interval to be decided on by the user. For example, when you fill in a value of 3 here, an autoreply will be sent every three days. This functions prevents you from replying to every message that is received from a certain e-mail address. It is advised not to fill in 0 here, to make sure that an unnecessary large amount of mail traffic is being created and to prevent two autoresponders from sending each other an unlimited amount of replies.
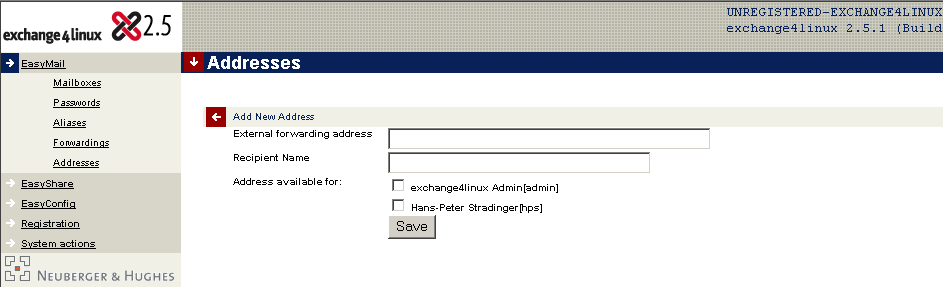
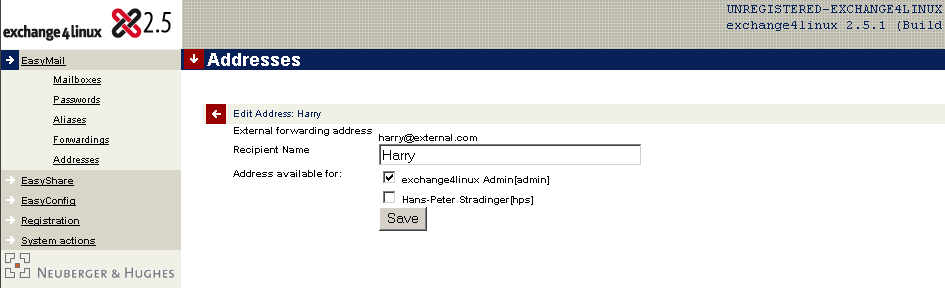
To add an external address, the administrator must select the menu item Addresses. Now click the arrow-button at the left of the title bar and complete the form that appears. Fill in the empty form (Figure 7.12) in accordance with the following rules:
Field name | Contents | Remarks |
|---|---|---|
External forwarding address | Fill in the complete e-mail address | Include both the part in front of and the part behind the @ symbol. |
Recipient name | A descriptive name of the external address | Spaces are allowed. |
Address available for | All mailboxes are displayed with a checkbox | Click the checkbox next to the mailboxes that should have access to this address. |
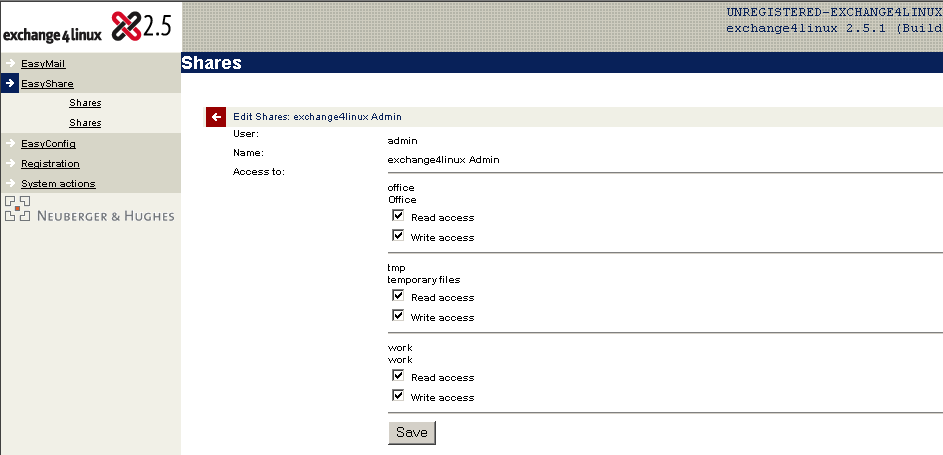
With EasyShare it is possible to manage fileshares. This way, important files can be made available to several (or all) users of the network.


Field name | Contents | Remarks |
|---|---|---|
Share | The name of the share, under which it is known on the network | The name can contain no more than 10 characters and cannot be changed afterwards. This is also the name which is used in Windows Explorer to reach the share. |
Name | Fill in the complete name of the share | This name can be altered afterwards. |
When the user, to whom privileges are to be granted, is selected, it is possible to indicate what his or her rights are for each share. Simply tick off and save the desired user privileges.

| Caution: |
|---|---|
|
To let the users work with shares from a Windows environment, it is
necessary that the network-logon takes place using the mailbox name and the
password the user has on exchange4linux. If this is not the case, the user
will not receive the proper user privileges at start-up.
| |
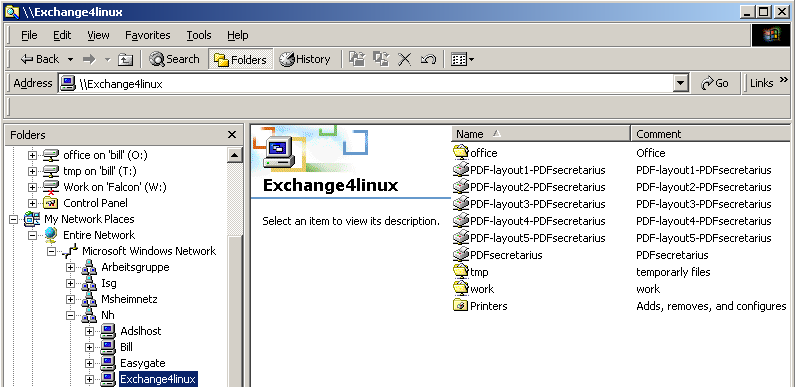
If this method does not succeed, right-click Network neighborhood and then select Map network drive. In the dialog that appears a drive letter can be chosen, fill in the following in the Path-field:
\\exchange4linux\sharename or \\<internal-ip-address-exchange4linux>\sharename
For example: \\exchange4linux\home or \\192.168.1.2\home

Kernel:
General system notifications are displayed here, especially those related to
the start-up processes, the file system and the loading of drivers.
Disk:
This item gives an overview of the existing partitions on the system and the
amount of free disk space. This way, one can discover in advance whether a new
harddisk has to be added or disk space has to be created on the system.
e-mail queue:
Messages that have not yet been sent are displayed here.
e-mail fetch log:
This item shows information on potential POP3 accounts that are being managed
by exchange4linux.
Batched SMTP:
When Batched SMTP is being used, information on the mail distribution will be
shown here.
e-mail logs:
This item will display all e-mail related processes that are active on
exchange4linux. The handling of every item that has been sent or received can be
reviewed in this logfile.
POP3/IMAP:
E-mail is being distributed towards the individual users by means of POP3 or
IMAP. Here you are notified of potential problems during the distribution.
exchange4linux:
Every notification with regard to the groupware functionality (see Chapter 2) of exchange4linux can be found here.
When a fax device is implemented on exchange4linux, there will also be an item called ISDN- and Fax logging to display the status of the ISDN channels and the faxserver.
Menu item | Possible action |
|---|---|
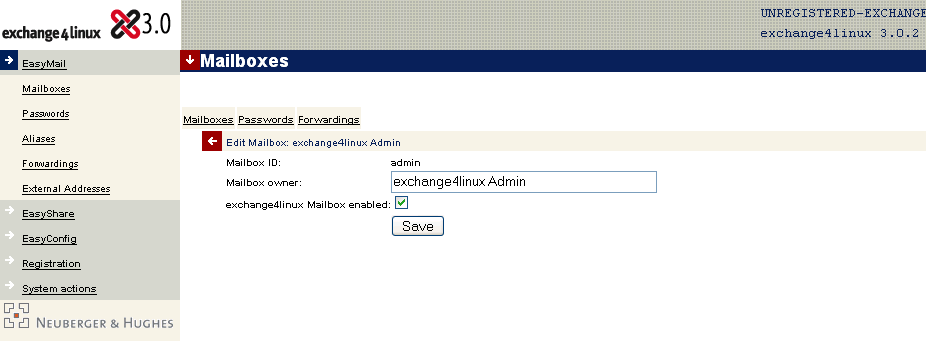
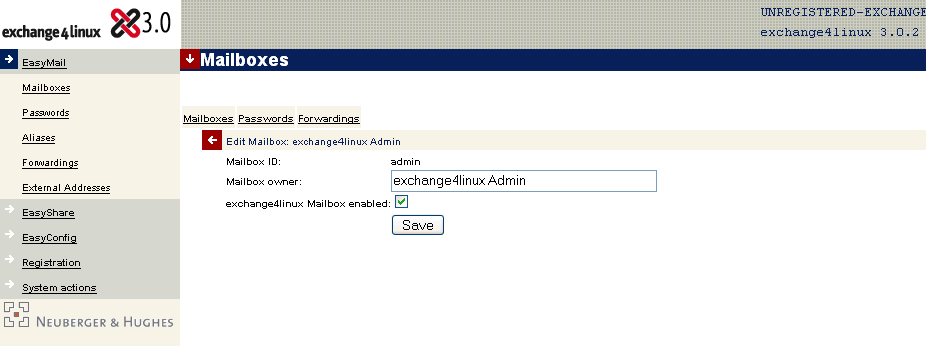
Mailboxes | The describing name can be changed here. |
Passwords | The user can change his password here. |
Aliases | The user can see the aliases that refer to his mailbox. It is not possible to change the configuration of aliases yourself. |
Forwarding | The user can forward or distribute his e-mail to other users, for instance when he is on vacation and his secretary has to receive his mail. One can also (de)activate the autoresponder here. |
External addresses | Here, the user can see which external e-mail addresses can be referred to when forwarding one’s e-mail. |
Menu item | Possible action |
|---|---|
Shares | The user can edit the settings of fileshares for which he has been assigned at least read access. |
User privileges | The user cannot change the settings here, but it is possible to view the permissions assigned to him/her. |
This part explains how to set up your workstation to use e.g. fax or the EasyPDF service. Also it is described how to set up your Outlook version to use the possibilities exchange4linux offers.
Setting | Fill in |
|---|---|
Connection | Using local network, using LAN. |
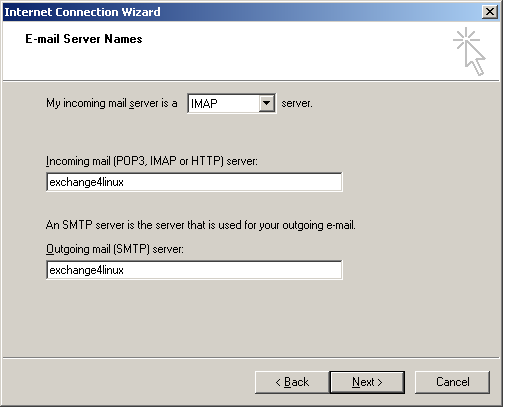
Type of server | POP3 or IMAP |
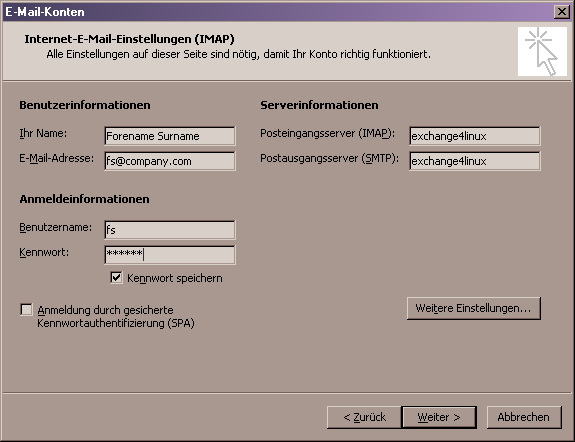
Server for incoming mail, or POP3 or IMAP4 server | exchange4linux |
Server for outgoing mail, or SMTP server | exchange4linux |
Port numbers (the default settings are correct, usually no alteration is needed) | 25 for SMTP, 110 for POP3 and 143 for IMAP4 |
POP3-name, IMAP-username, username, login-name | Mailbox-name on exchange4linux, when an alias is being used: the name of the underlying mailbox. |
Password | The password that belongs to the above-mentioned mailbox |
e-mail address | The full e-mail address that is to be used, so the combination of the mailbox-name or the alias and <@domainname.com>. |
| Caution: |
|---|---|
| For a fast e-mail communication the application can be configured so that it will
check every 2 minutes for new messages. Furthermore, one can select to
send e-mail directly. | |
IMAP or POP3 mail:
Every user can choose between IMAP and POP3 mail. When these terms are unknown,
please consult Chapter 2 at the beginning of this manual. There is no
setting to be made on the exchange4linux server itself concerning either IMAP or
POP3 mail, since both methods are being supported simultaneously. The only way to
select one of these protocols is through the configuration of the e-mail
application. As can be seen in the example below, there is always a setting called
servertype. Normally you can choose between POP3 and IMAP here.
Webmail:
On the exchange4linux Server Suite Squirrelmail Webmail has been implemented. This
easy-to-use and secure webbased e-mail client can be reached easily through the
exchange4linux welcome screen on http://exchange4linux . For more information on
how to use Squirrelmail you are advised to consult its manual, which can be found at
http://www.squirrelmail.org.
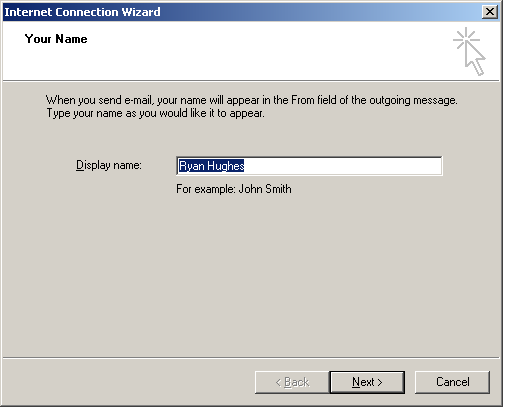
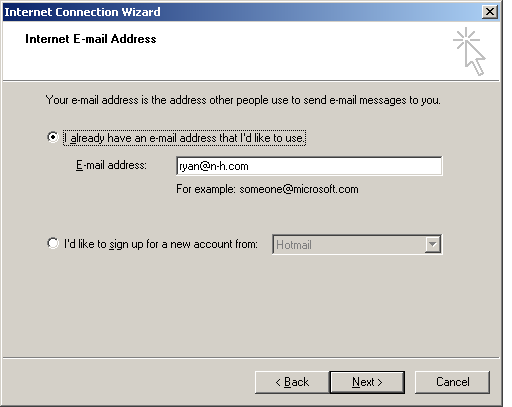
Example: Microsoft Outlook Express:
On Figure 8.1 to Figure 8.4 several dialogs of the Microsoft Outlook Express Configuration
wizard are shown. The procedure is comparable when using Microsoft Outlook 97, 98,
2000, XP and 2003. The possibilities when configuring e-mail for an IMAP or POP3
account are slightly different, but these differences are so small that they do not
need to be discussed here.

http://www.uli-eckhardt.de/whfc/
| Caution |
|---|---|
| WHFC is NOT an Neuberger & Hughes product. Consequently
there is no support given on the software by N&H or any of its partners.
When WHFC does not suffice your requirements you can decide on the acquisition of a
commercial faxclient, eg. Cypheus (see http://www.cypheus.de). A commercial faxclient
usually comes with support by its manufacturer. | |
After the standard installation of the executable, the following needs to be set up in the section system settings.

Hostname:
Fill in exchange4linux.
Port No.:
Leave this to the default setting of 4559.
Job format:
Leave this entry unaltered.
The other settings can be changed as wished. In case of doubt you are referred to the website of the manufacturer.
There are also several settings that need to be made in the menu user settings:
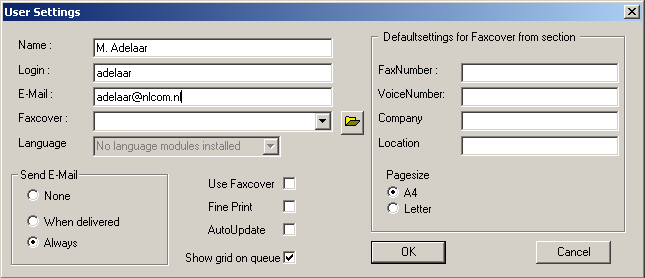
Login:
The login here is equal to the mailbox-name on exchange4linux for this user.
E-Mail:
The e-mail address to which a confirmation of an outgoing fax will be sent.
Usually this is the e-mail address of the user itself.
Only when PostScript cover letters are being used, you should pay attention to the other items. For more information on composing fax covers, please consult the website of the manufacturer.
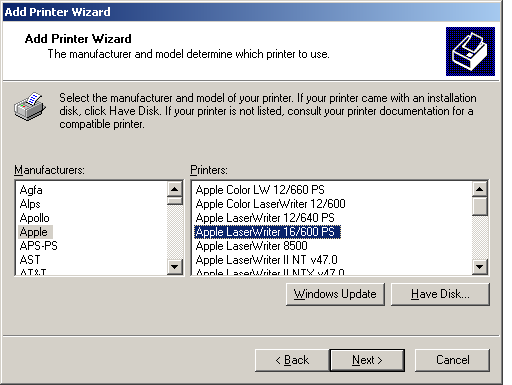
Installing the printerdriver:
Now the faxclient must be installed as a virtual printer in the Control panel for
printers and faxes. To do this, go to the Control panel, then click
the item printers and faxes and finally click add
printer. Select as a printer port WHFCFAX and as a
printer, when Windows 98/NT/2000/XP is being used: the Apple LaserWriter
16/600 PS. When using Windows 95: choose the Apple LaserWriter.

Sending a fax message:
To send a fax from eg. Microsoft Word, go to File - Print. Now
select the Apple printer that has just been installed and click
OK. Now a dialog appears in which some data of the recipient
has to be entered. The fax will now be sent and the sender will receive a
confirmation of this action by e-mail.
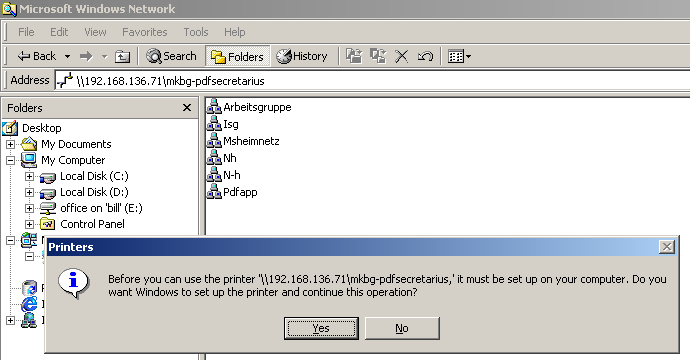
- Through Windows Explorer: Open Windows Explorer and insert the hostname
(usually exchange4linux) or the IP-address of the
exchange4linux Server Suite in the address bar in the following way:
\\name-or-ip-address\
Now the PDFsecretarius printer should be visible. Double click it and choose to install the printer. The Easy PDF Service is ready to use as soon as the empty printer queue appears on-screen. - Using the DOS-prompt: Enter the following line in a Command Prompt Window
(cmd.exe) (Figure 8.9):
rundll32 printui.dll,PrintUIEntry /in /n \\name-or-ip-address\PDFsecretarius
With, instead of name-or-ip-address the IP-address or hostname (usually exchange4linux) of the exchange4linux Server Suite. This command can also be added to a netlogon script.

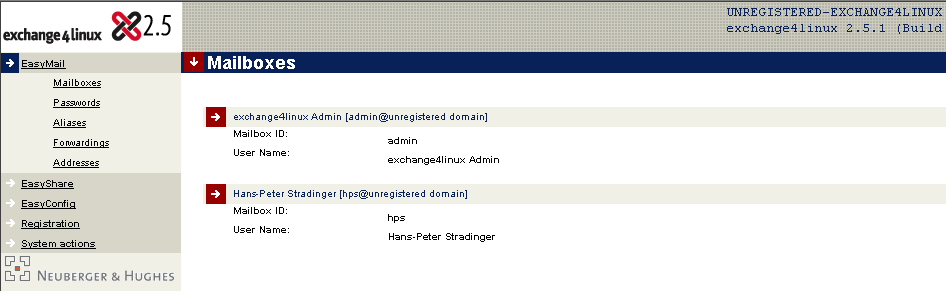
After logging in as admin on the exchange4linux web interface, there are several settings of importance when managing the users. When a new user is added, there are the following possibilities (Figure 9.1):
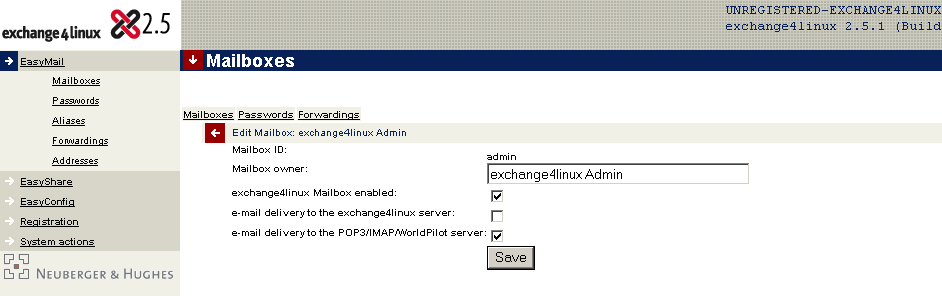
In order to use exchange4linux function A + B, a Neuberger & Hughes Outlook Connector (and license) is required. For normal e-mail usage through POP3/IMAP this is not the case. In such a situation it suffices to activate option C. An exchange4linux user has got, next to sending and receiving e-mail, the possibility to share his agenda, notes, address book, etc. with other exchange4linux users. Activating this person as an exchange4linux user is only meaningful when this person uses Microsoft Outlook and wants to access shared folders. Adding a POP3/IMAP mailbox is necessary in all other cases and when a user wants to access his e-mail, next to Outlook, with another application (eg. Microsoft Outlook Express, Mozilla, Netscape Mail, Eudora, webmail etc.). |
A + B:
exchange4linux user + mail through exchange4linux (full E4L-account)A + C:
exchange4linux user + mail through POP3/IMAP (combination account)
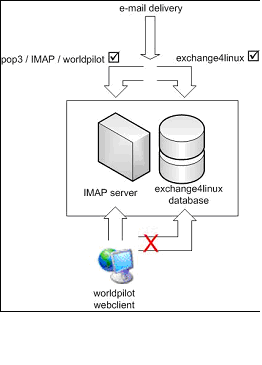
Full E4L-account:
When you use full E4L-accounts (A+B), all the workgroup data of these users will
be saved in the central E4L-database. Setting up a full E4L-account within Outlook
is very simple: only one service needs to be added to the profile. The folder
structure within Outlook is clear and consists of one set of personal exchange4linux
folders and one set of public exchange4linux folders. For configuration
possibilities see the table below.
Combination account:
By using combination accounts (A + C), the mail objects of these users is being
kept outside of the exchange4linux database. This way your database remains small,
fast and this makes your server suitable for a significantly larger amount of users.
When you use exchange4linux in combination with IMAP, all data still remains
centrally on the server! Within Outlook this requires some additional configuration
work, since multiple services need to be added to the profile. The consequence of
this approach is that there will appear two sets of e-mail folders within Outlook:
one exchange4linux tree and one IMAP tree. Incoming messages will appear in the IMAP
inbox. Outgoing e-mail, drafts, etc. will be saved in the exchange4linux folders.
For more info, see the configuration possibilities in the table below.
| Caution: |
|---|---|
| Outlook 97, 98 and 2000 can only be combined with POP3 e-mail in Workgroup-mode.
This is a limitation of Outlook which is resolved in Outlook XP, where workgroup
items and IMAP mail can be used simultaneously. | |
To make a mailbox for distribution purposes, there are the same possibilities. Here you also need to point out whether it concerns a regular POP3/IMAP/Webmail mailbox and/or an exchange4linux mailbox.
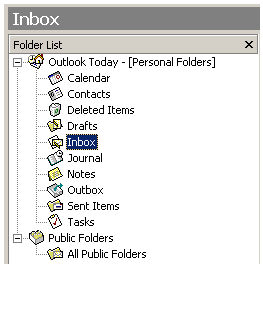
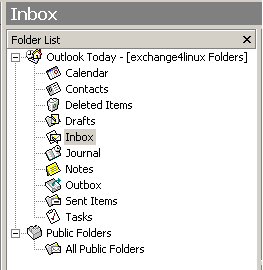
Outlook XP(2002)/2003 | Outlook 97/98/2000 | |
|---|---|---|
Full exchange4linux account:
|  |  |
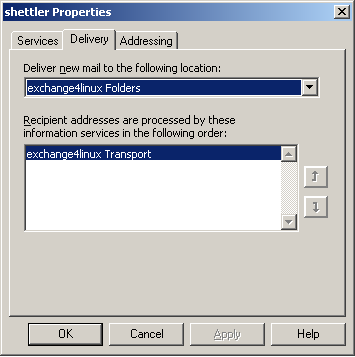
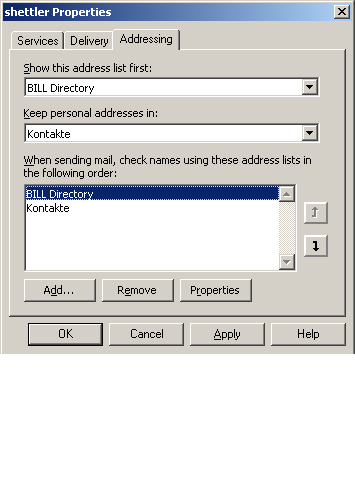
exchange4linux in combination with POP3/IMAP:
|  |  |
Before you start:
Before you start you need to be sure that there is an active, correctly installed
exchange4linux server in your network. Furthermore you need to have a username and
the corresponding password at hand.
The most recent Outlook Connector can be downloaded from the website: http://www.exchange4linux.com
When an older version of the Outlook Connector is installed on the workstation, please notify yourself of the version that is being used at this moment. Sometimes the active version needs to be de-installed completely before starting the installation process of the new Connector. To do this, read the instructions in this manual or on the exchange4linux website. When in doubt, consult your exchange4linux Service Center.
To make Microsoft Outlook 97, 98 and 2000 suitable for the exchange4linux Server Suite, there are several settings that need to be made on the workstation. To begin with, Outlook must be configured for usage in the Workgroup mode. You can confirm this through the menu item Help - About Microsoft Outlook. When the term Workgroup is not visible here, but instead Internet Mail, Outlook needs to be re-configured. To do this, go to Tools - Options - Tab Mail delivery and click Reconfigure Mail Support. Now choose the option Workgroup.
- Outlook XP or Outlook 97/98/2000 in workgroup mode
- Default transport service: exchange4linux through MAPI
- The standard Outlook Connector is being used
Close Outlook. Make sure that the processes outlook.exe and mapisp32.exe do not run anymore by opening the Windows Task Manager. If necessary, close them manually.
Install the Outlook Connector (exchange4linux-setup-xxx.exe)
Make a new profile at Control panel - Mail (Outlook 2003: E-mail) which you name eg. exchange4linux. If you want to, you can let Outlook ask which profile to use when starting the program (Section 9.9).
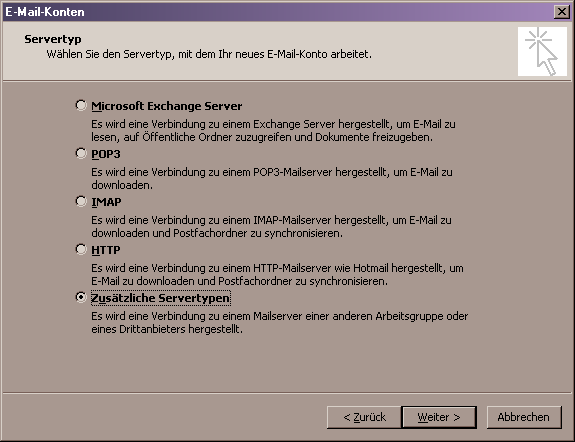
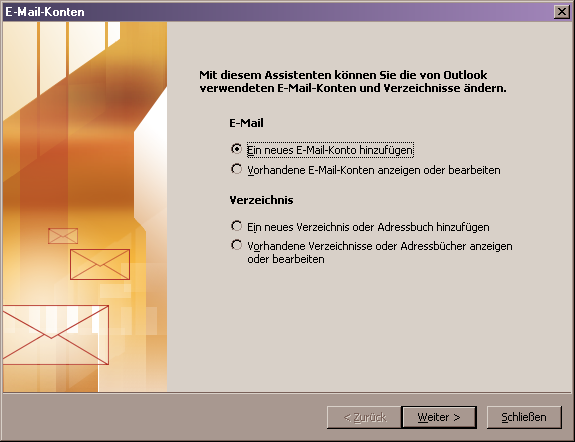
First, add a new e-mail account to this profile. Choose the category additional server types (Figure 9.4 and Figure 9.5). In Outlook 2000 choose Manually configure information services, Figure 9.6.
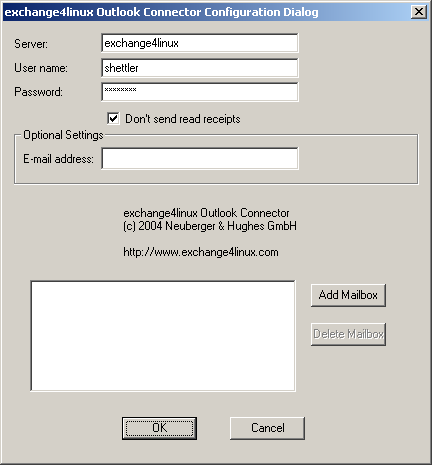
Fill in the IP-address of the exchange4linux server, together with the mailbox name and the corresponding password (Figure 9.7). Check Don’t send read receipts to make sure that no read confirmation (see Chapter 2) will ever be returned. The e-mail address is composed in the following way: <mailbox name>@domainname.com. With Outlook Connector 2.5.8 and higher it is possible to set up another sender’s address that accompanies every message. See Optional settings: E-mail address. At Add mailbox one can add one or more delegate accounts if applicable. This functionality will be explained in more detail in Section 9.8.
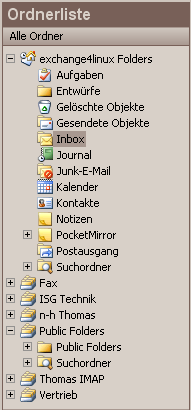
Start Outlook, the folder list will look somewhat similar to Figure 9.8.
Go to Tools - Address book and choose Tools - Options. The settings here need to correspond to those visible in Figure 9.3.
It could be that after a first installation you get warning messages with regard to the information archive or the demo mode. Please ignore such a message and restart Outlook.
Control whether Outlook functions properly.


Specifications:
|
- Outlook XP
- Default transport service: depends on the order of installing accounts
- Available services: (combinations of) E4L, POP3 and IMAP accounts
- The standard Outlook Connector is being used
Close Outlook. Make sure that the processes outlook.exe and mapisp32.exe do not run anymore by opening the Windows Task Manager. If necessary, close them manually.
Install the Outlook Connector (exchange4linux-setup-xxx.exe)
Make a new profile at Control panel - Mail (Outlook 2003: E-mail) which you name eg. exchange4linux. If you want to, you can let Outlook ask which profile to use when starting the program (see Section 9.9).
Caution:
The order in which the different accounts are being configured decides Default transport service (see Chapter 2). When you configure a POP3/IMAP account first, then this will be the Default transport service and mail will accordingly be sent through the standard SMTP service of Outlook. When an exchange4linux account is configured first, mail will be sent using the MAPI service of the Outlook Connector.Add a new e-mail account to this profile (POP3 or IMAP), the Default transport service will thus be the standard SMTP service of Outlook (Figure 9.9 and Figure 9.10).
Fill in the necessary account data (Figure 9.11).
Start Outlook, the folder tree will look somewhat similar to Figure 9.12.
It could be that after a first installation you get warning messages with regard to the information archive or the demo mode. Please ignore such a message and restart Outlook.
At this point additional e-mail accounts can be added. When you choose a POP3/IMAP account at step 5, you will normally select an exchange4linux account now and vice versa (see Section 9.3 on how to add an exchange4linux account to an Outlook profile).
Control whether Outlook functions properly. After adding an exchange4linux account the folder tree will look somewhat similar to Figure 9.13.

Specifications:
|
- Outlook 97/98/2000
- Default transport service: depends on the order of installing accounts
- Available services: (combinations of) E4L and POP3 accounts
- The standard Outlook Connector is being used when exchange4linux is set up as
the Default transport service.
- When the POP3 account functions as Default transport service, use the
modified Outlook Connector
(exchange4linux-setup-pop3pst-xxx.exe, see for more info http://www.exchange4linux.com).
| Caution: |
|---|---|
| The order in which the accounts are being configured decides the Default
transport service (see Chapter 2). When a POP3 account has been
configured first, this will be the Default transport service and mail is being sent
through the standard Outlook SMTP service. In this case the special, modified
Outlook Connector (exchange4linux-setup-pop3pst-xxx.exe) must be used. Please follow
the installation procedures described below: | |
Close Outlook. Make sure that the processes outlook.exe and mapisp32.exe do not run anymore by opening the Windows Task Manager. If necessary, close them manually.
Install the correct Outlook Connector, depending on the Default transport service (exchange4linux-setup-pop3pst-xxx.exe in case of POP3).
Make a new profile at Control panel - Mail (Outlook 2003: E-mail) which you name eg. exchange4linux. If you want to, you can let Outlook ask which profile to use when starting the program (Section 9.9).
Add a POP3 account (Internet e-mail) to this profile first, so that it will use the Outlook SMTP service as Default transport service (Figure 9.6).
Fill in the necessary account data.
Start Outlook, the folder tree should resemble Figure 9.12.
It could be that after a first installation you get warning messages with regard to the information archive or the demo mode. Please ignore such a message and restart Outlook.
Now the exchange4linux account can be added as is described in Section 9.3.
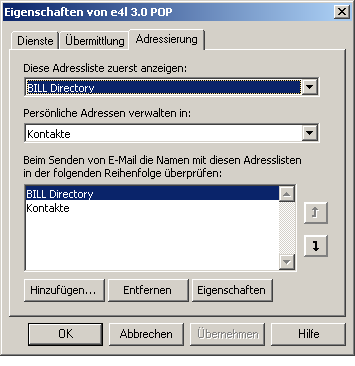
Go to Control panel - post and then to the tab Delivery. Make sure that the first item, Deliver new e-mail to, has got the personal folders selected. Furthermore at the tab Addressing the following settings need to be made (Figure 9.14 and Figure 9.15):
Show this address list first:
Bill DirectoryKeep personal addresses in:
Contacts
Control whether Outlook functions properly.
When you choose to make an exchange4linux account first, the mail will be transferred using the MAPI services of the installed normal connector. In this situation you first follow the installation procedure as described in Section 9.3, followed by setting up the POP3 account. |
Specifications:
|
Install the web publishing wizard on the desired workstations. The program can be downloaded from the following location:
http://www.microsoft.com/downloads/release.asp?ReleaseID=22658&area=search&ordinal=2
Adjust these settings in Outlook: At Options - Calendar options - Free/busy options (Outlook 2003: Availability information):
Publish at this URL: ftp://exchange4linux/freebusy/%NAME%.vfb
Search at this URL: http://exchange4linux/freebusy/%NAME%.vfb
Confirm this alteration by clicking OK for several times. Then go to Send & receive - Free/busy information (Outlook 2003: Availability information).
Personal exchange4linux folders are managed centrally on the server, but are only accessible for the specific user. These folders can contain among other things e-mail messages, calendar items, contacts, etc. Since this information is stored centrally, the items can be accessed from every workstation on which this specific exchange4linux profile is activated. It is possible to make new folders yourself (Figure 9.17) and, in case of a public folder, to make it visible/editable for all or certain workgroup users. In other words: one can allow certain users to e.g. be able to delete or edit items in this folder (Figure 9.18). The default settings hold for all users except for those that are mentioned specifically.
Because of security reasons, only the user admin is allowed to make new subfolders within the public folder tree. When it is desired that other users are permitted to do this as well, please follow this procedure:

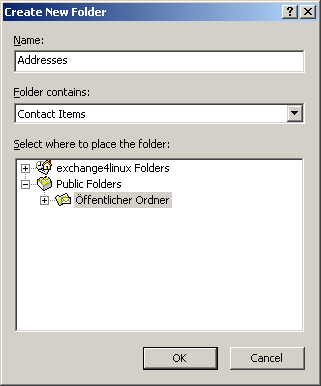
Open Outlook as user admin.
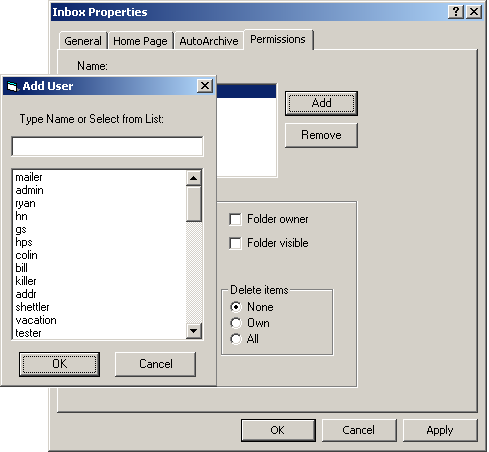
Right-click the main folder Public Folders and click Properties.
Go to the tab Permissions and add the users that are allowed to make new folders (or select Default when all users should be allowed to do this).
Make sure that the applicable users have got all permissions checked here (except for Folder owner).
| Caution: |
|---|---|
| No one but the user that has created a folder is allowed to remove it! | |
-
Create items the user is allowed to add new items to the folder.
-
Read items all the items within the folder are visible to the user.
-
Create subfolders the user can create a subfolder within this
specific folder.
-
Folder owner the user is able to change the permissions for
other users.
-
Folder visible the folder itself is visible to the user.
-
Edit items in case of none the user is not
allowed to edit items, in case of own the user may edit his own
items and in case of all the user is allowed to change all
items within the folder.
-
Delete items in case of none the user is not
allowed to delete items, in case of own the user may delete his
own items and in case of all the user is allowed to delete
all items within the folder.

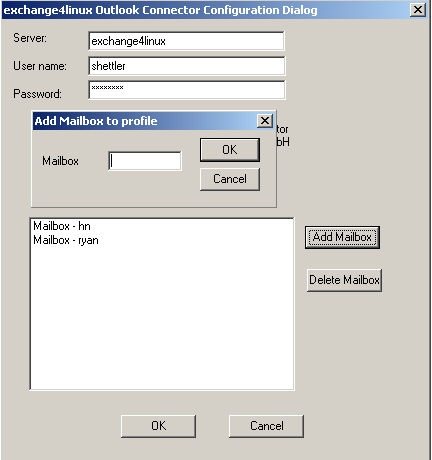
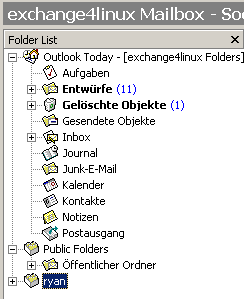
Appoint permissions to users that you want to allow access to certain personal folders, eg. calendar and inbox. Do this by right-clicking the folder in question, selecting Properties and then by going to the tab Permissions. The settings are similar to those available for a public folder, described in the previous paragraph. On Figure 9.19 the user bogaard gets permission to read items in a certain folder of this user.
User bogaard can now decide to make this folder visible in his Outlook profile. This is done by browsing to account properties (go to Extra - E-mail accounts - Display or edit existing e-mail accounts - exchange4linux Server - edit). Here the mailbox name can be inserted of the user whose personal folders are to be displayed, eg. ryan (see Figure 9.20).
From now on the folders that have been selected for this purpose will be visible, and with the proper permissions it is also possible to add/remove items (Figure 9.21).
| Caution: |
|---|---|
| due to the additional load on the exchange4linux server that is caused by using
delegate accounts, it is advised not to set up over five delegates per user. | |
In case you suffer sudden problems with the functioning of Microsoft Outlook, please shutdown the program and restart it. Always make sure that the processes outlook.exe and mapisp32.exe do not run anymore after shutting down the application. Do this by opening the Windows Task Manager (press Ctrl – Alt – Esc simultaneously). If necessary, close them manually here.
When using delegate accounts there will be an additional folder in the tree with the mailbox name of the user that has granted you access rights.
When multiple persons use the same workstation, there needs to be a separate Outlook- (or even better a Windows-) profile for every user. Please make sure that the correct mailbox name and password are filled in for all of them.
It can occur that some mails include an attachment called winmail.dat. This has got nothing to do with exchange4linux. A thorough explanation for this phenomenon is given by Microsoft on the following URL: http://support.microsoft.com/?kbid=241538
Items for which one want to set up a reminder need to be made in the corresponding folder of the Default transport service.
Outlook will always check free/busy times based on the corresponding folder of the Default transport service.
When exchange4linux is being used as the Default transport service, the functionality read receipts is not supported.
When exchange4linux is being used as the Default transport service, it is not possible to send e-mail messages directly from other Microsoft applications (like Word, Excel, etc.)
Outlook 97 and 98 do not offer the functionality to grant permissions for (public) folders.
Outlook 97 and 98 do not offer the possibility to use free/busy times information.
At this point in time, sending HTML-mail is only supported when exchange4linux is not set up as the Default transport service.
Sometimes it can occur that after installing a new Connector, a new profile must be made. Settings of a previous profile can easily be copied though. This way one does not need to configure the new profile after it has been added.
Table of Contents
                                    Apache License
                           Version 2.0, January 2004
                        http://www.apache.org/licenses/

   TERMS AND CONDITIONS FOR USE, REPRODUCTION, AND DISTRIBUTION

   1. Definitions.

      "License" shall mean the terms and conditions for use, reproduction,
      and distribution as defined by Sections 1 through 9 of this document.

      "Licensor" shall mean the copyright owner or entity authorized by
      the copyright owner that is granting the License.

      "Legal Entity" shall mean the union of the acting entity and all
      other entities that control, are controlled by, or are under common
      control with that entity. For the purposes of this definition,
      "control" means (i) the power, direct or indirect, to cause the
      direction or management of such entity, whether by contract or
      otherwise, or (ii) ownership of fifty percent (50%) or more of the
      outstanding shares, or (iii) beneficial ownership of such entity.

      "You" (or "Your") shall mean an individual or Legal Entity
      exercising permissions granted by this License.

      "Source" form shall mean the preferred form for making modifications,
      including but not limited to software source code, documentation
      source, and configuration files.

      "Object" form shall mean any form resulting from mechanical
      transformation or translation of a Source form, including but
      not limited to compiled object code, generated documentation,
      and conversions to other media types.

      "Work" shall mean the work of authorship, whether in Source or
      Object form, made available under the License, as indicated by a
      copyright notice that is included in or attached to the work
      (an example is provided in the Appendix below).

      "Derivative Works" shall mean any work, whether in Source or Object
      form, that is based on (or derived from) the Work and for which the
      editorial revisions, annotations, elaborations, or other modifications
      represent, as a whole, an original work of authorship. For the purposes
      of this License, Derivative Works shall not include works that remain
      separable from, or merely link (or bind by name) to the interfaces of,
      the Work and Derivative Works thereof.

      "Contribution" shall mean any work of authorship, including
      the original version of the Work and any modifications or additions
      to that Work or Derivative Works thereof, that is intentionally
      submitted to Licensor for inclusion in the Work by the copyright owner
      or by an individual or Legal Entity authorized to submit on behalf of
      the copyright owner. For the purposes of this definition, "submitted"
      means any form of electronic, verbal, or written communication sent
      to the Licensor or its representatives, including but not limited to
      communication on electronic mailing lists, source code control systems,
      and issue tracking systems that are managed by, or on behalf of, the
      Licensor for the purpose of discussing and improving the Work, but
      excluding communication that is conspicuously marked or otherwise
      designated in writing by the copyright owner as "Not a Contribution."

      "Contributor" shall mean Licensor and any individual or Legal Entity
      on behalf of whom a Contribution has been received by Licensor and
      subsequently incorporated within the Work.

   2. Grant of Copyright License. Subject to the terms and conditions of
      this License, each Contributor hereby grants to You a perpetual,
      worldwide, non-exclusive, no-charge, royalty-free, irrevocable
      copyright license to reproduce, prepare Derivative Works of,
      publicly display, publicly perform, sublicense, and distribute the
      Work and such Derivative Works in Source or Object form.

   3. Grant of Patent License. Subject to the terms and conditions of
      this License, each Contributor hereby grants to You a perpetual,
      worldwide, non-exclusive, no-charge, royalty-free, irrevocable
      (except as stated in this section) patent license to make, have made,
      use, offer to sell, sell, import, and otherwise transfer the Work,
      where such license applies only to those patent claims licensable
      by such Contributor that are necessarily infringed by their
      Contribution(s) alone or by combination of their Contribution(s)
      with the Work to which such Contribution(s) was submitted. If You
      institute patent litigation against any entity (including a
      cross-claim or counterclaim in a lawsuit) alleging that the Work
      or a Contribution incorporated within the Work constitutes direct
      or contributory patent infringement, then any patent licenses
      granted to You under this License for that Work shall terminate
      as of the date such litigation is filed.

   4. Redistribution. You may reproduce and distribute copies of the
      Work or Derivative Works thereof in any medium, with or without
      modifications, and in Source or Object form, provided that You
      meet the following conditions:

      (a) You must give any other recipients of the Work or
          Derivative Works a copy of this License; and

      (b) You must cause any modified files to carry prominent notices
          stating that You changed the files; and

      (c) You must retain, in the Source form of any Derivative Works
          that You distribute, all copyright, patent, trademark, and
          attribution notices from the Source form of the Work,
          excluding those notices that do not pertain to any part of
          the Derivative Works; and

      (d) If the Work includes a "NOTICE" text file as part of its
          distribution, then any Derivative Works that You distribute must
          include a readable copy of the attribution notices contained
          within such NOTICE file, excluding those notices that do not
          pertain to any part of the Derivative Works, in at least one
          of the following places: within a NOTICE text file distributed
          as part of the Derivative Works; within the Source form or
          documentation, if provided along with the Derivative Works; or,
          within a display generated by the Derivative Works, if and
          wherever such third-party notices normally appear. The contents
          of the NOTICE file are for informational purposes only and
          do not modify the License. You may add Your own attribution
          notices within Derivative Works that You distribute, alongside
          or as an addendum to the NOTICE text from the Work, provided
          that such additional attribution notices cannot be construed
          as modifying the License.

      You may add Your own copyright statement to Your modifications and
      may provide additional or different license terms and conditions
      for use, reproduction, or distribution of Your modifications, or
      for any such Derivative Works as a whole, provided Your use,
      reproduction, and distribution of the Work otherwise complies with
      the conditions stated in this License.

   5. Submission of Contributions. Unless You explicitly state otherwise,
      any Contribution intentionally submitted for inclusion in the Work
      by You to the Licensor shall be under the terms and conditions of
      this License, without any additional terms or conditions.
      Notwithstanding the above, nothing herein shall supersede or modify
      the terms of any separate license agreement you may have executed
      with Licensor regarding such Contributions.

   6. Trademarks. This License does not grant permission to use the trade
      names, trademarks, service marks, or product names of the Licensor,
      except as required for reasonable and customary use in describing the
      origin of the Work and reproducing the content of the NOTICE file.

   7. Disclaimer of Warranty. Unless required by applicable law or
      agreed to in writing, Licensor provides the Work (and each
      Contributor provides its Contributions) on an "AS IS" BASIS,
      WITHOUT WARRANTIES OR CONDITIONS OF ANY KIND, either express or
      implied, including, without limitation, any warranties or conditions
      of TITLE, NON-INFRINGEMENT, MERCHANTABILITY, or FITNESS FOR A
      PARTICULAR PURPOSE. You are solely responsible for determining the
      appropriateness of using or redistributing the Work and assume any
      risks associated with Your exercise of permissions under this License.

   8. Limitation of Liability. In no event and under no legal theory,
      whether in tort (including negligence), contract, or otherwise,
      unless required by applicable law (such as deliberate and grossly
      negligent acts) or agreed to in writing, shall any Contributor be
      liable to You for damages, including any direct, indirect, special,
      incidental, or consequential damages of any character arising as a
      result of this License or out of the use or inability to use the
      Work (including but not limited to damages for loss of goodwill,
      work stoppage, computer failure or malfunction, or any and all
      other commercial damages or losses), even if such Contributor
      has been advised of the possibility of such damages.

   9. Accepting Warranty or Additional Liability. While redistributing
      the Work or Derivative Works thereof, You may choose to offer,
      and charge a fee for, acceptance of support, warranty, indemnity,
      or other liability obligations and/or rights consistent with this
      License. However, in accepting such obligations, You may act only
      on Your own behalf and on Your sole responsibility, not on behalf
      of any other Contributor, and only if You agree to indemnify,
      defend, and hold each Contributor harmless for any liability
      incurred by, or claims asserted against, such Contributor by reason
      of your accepting any such warranty or additional liability.

   END OF TERMS AND CONDITIONS

   APPENDIX: How to apply the Apache License to your work.

      To apply the Apache License to your work, attach the following
      boilerplate notice, with the fields enclosed by brackets "[]"
      replaced with your own identifying information. (Don't include
      the brackets!)  The text should be enclosed in the appropriate
      comment syntax for the file format. We also recommend that a
      file or class name and description of purpose be included on the
      same "printed page" as the copyright notice for easier
      identification within third-party archives.

   Copyright [yyyy] [name of copyright owner]

   Licensed under the Apache License, Version 2.0 (the "License");
   you may not use this file except in compliance with the License.
   You may obtain a copy of the License at

       http://www.apache.org/licenses/LICENSE-2.0

   Unless required by applicable law or agreed to in writing, software
   distributed under the License is distributed on an "AS IS" BASIS,
   WITHOUT WARRANTIES OR CONDITIONS OF ANY KIND, either express or implied.
   See the License for the specific language governing permissions and
   limitations under the License.
The ISC license for bind is:

------
# Copyright (c) 1993-1999 by Internet Software Consortium.
##
## Permission to use, copy, modify, and distribute this software for any
## purpose with or without fee is hereby granted, provided that the
above
## copyright notice and this permission notice appear in all copies.
##
## THE SOFTWARE IS PROVIDED "AS IS" AND INTERNET SOFTWARE CONSORTIUM
DISCLAIMS
## ALL WARRANTIES WITH REGARD TO THIS SOFTWARE INCLUDING ALL IMPLIED
WARRANTIES
## OF MERCHANTABILITY AND FITNESS. IN NO EVENT SHALL INTERNET SOFTWARE
## CONSORTIUM BE LIABLE FOR ANY SPECIAL, DIRECT, INDIRECT, OR
CONSEQUENTIAL
## DAMAGES OR ANY DAMAGES WHATSOEVER RESULTING FROM LOSS OF USE, DATA OR
## PROFITS, WHETHER IN AN ACTION OF CONTRACT, NEGLIGENCE OR OTHER
TORTIOUS
## ACTION, ARISING OUT OF OR IN CONNECTION WITH THE USE OR PERFORMANCE
OF THIS
## SOFTWARE.

   Internet Software Consortium
   950 Charter Street
   Redwood City, CA 94063
   Tel: 1-888-868-1001
   Fax: 1-650-779-7055
   Email: licensing@isc.org
------

The RSA license is:

------
                        DNSSAFE LICENSE TERMS

This BIND software includes the DNSsafe software from RSA Data
Security, Inc., which is copyrighted software that can only be
distributed under the terms of this license agreement.

The DNSsafe software cannot be used or distributed separately from the
BIND software.  You only have the right to use it or distribute it as
a bundled, integrated product.

The DNSsafe software can ONLY be used to provide authentication for
resource records in the Domain Name System, as specified in RFC 2065
and successors.  You cannot modify the BIND software to use the
DNSsafe software for other purposes, or to make its cryptographic
functions available to end-users for other uses.

If you modify the DNSsafe software itself, you cannot modify its
documented API, and you must grant RSA Data Security the right to use,
modify, and distribute your modifications, including the right to use
any patents or other intellectual property that your modifications
depend upon.

You must not remove, alter, or destroy any of RSA's copyright notices
or license information.  When distributing the software to the Federal
Government, it must be licensed to them as "commercial computer
software" protected under 48 CFR 12.212 of the FAR, or 48 CFR
227.7202.1 of the DFARS.

You must not violate United States export control laws by distributing
the DNSsafe software or information about it, when such distribution
is prohibited by law.

THE DNSSAFE SOFTWARE IS PROVIDED "AS IS" WITHOUT ANY WARRANTY
WHATSOEVER.  RSA HAS NO OBLIGATION TO SUPPORT, CORRECT, UPDATE OR
MAINTAIN THE RSA SOFTWARE.  RSA DISCLAIMS ALL WARRANTIES, EXPRESS,
IMPLIED OR STATUTORY, AS TO ANY MATTER WHATSOEVER, INCLUDING ALL
IMPLIED WARRANTIES OF MERCHANTABILITY, FITNESS FOR A PARTICULAR
PURPOSE AND NON-INFRINGEMENT OF THIRD PARTY RIGHTS.

If you desire to use DNSsafe in ways that these terms do not permit,
please contact RSA Data Security, Inc., 100 Marine Parkway, Redwood
City, California 94065, USA, to discuss alternate licensing
arrangements.
CUPS is licensed under the GNU General Public License and
GNU Library General Public License.
Please contact Easy Software Products for commercial support
and "binary distribution" rights.
ALL versions of the Cyrus IMAP server are now covered by the following
copyright message. However, please note that in distributions before 2.0,
there may still be files that have the old copyright text.

* Copyright (c) 1994-2003 Carnegie Mellon University. All rights reserved.
*
* Redistribution and use in source and binary forms, with or without
* modification, are permitted provided that the following conditions
* are met:
*
* 1. Redistributions of source code must retain the above copyright
* notice, this list of conditions and the following disclaimer.
*
* 2. Redistributions in binary form must reproduce the above copyright
* notice, this list of conditions and the following disclaimer in
* the documentation and/or other materials provided with the
* distribution.
*
* 3. The name "Carnegie Mellon University" must not be used to
* endorse or promote products derived from this software without
* prior written permission. For permission or any legal
* details, please contact
* Office of Technology Transfer
* Carnegie Mellon University
* 5000 Forbes Avenue
* Pittsburgh, PA 15213-3890
* (412) 268-4387, fax: (412) 268-7395
* tech-transfer@andrew.cmu.edu
*
* 4. Redistributions of any form whatsoever must retain the following
* acknowledgment:
* "This product includes software developed by Computing Services
* at Carnegie Mellon University (http://www.cmu.edu/computing/)."
*
* CARNEGIE MELLON UNIVERSITY DISCLAIMS ALL WARRANTIES WITH REGARD TO
* THIS SOFTWARE, INCLUDING ALL IMPLIED WARRANTIES OF MERCHANTABILITY
* AND FITNESS, IN NO EVENT SHALL CARNEGIE MELLON UNIVERSITY BE LIABLE
* FOR ANY SPECIAL, INDIRECT OR CONSEQUENTIAL DAMAGES OR ANY DAMAGES
* WHATSOEVER RESULTING FROM LOSS OF USE, DATA OR PROFITS, WHETHER IN
* AN ACTION OF CONTRACT, NEGLIGENCE OR OTHER TORTIOUS ACTION, ARISING
* OUT OF OR IN CONNECTION WITH THE USE OR PERFORMANCE OF THIS SOFTWARE.

If you find this software useful and valuable in your work, we welcome any
support you can offer toward continuing this work.

We gratefully accept contributions, whether intellectual or monetary.
Intellectual contributions in the form of code or constructive collaboration
can be directed to cyrus-bugs+@andrew.cmu.edu (even if it is not a bug).

If you wish to provide financial support to the Cyrus Project, send a check
payable to Carnegie Mellon University to

                Project Cyrus
                Computing Services
                Carnegie Mellon University
                5000 Forbes Ave
                Pittsburgh, PA 15213
                USA
This program is free software; you can redistribute it and/or modify
it under the terms of the GNU General Public License as published by
the Free Software Foundation; either version 2, or (at your option)
any later version.

This program is distributed in the hope that it will be useful,
but WITHOUT ANY WARRANTY; without even the implied warranty of
MERCHANTABILITY or FITNESS FOR A PARTICULAR PURPOSE.  See the
GNU General Public License for more details.
                          GNU GENERAL PUBLIC LICENSE
		       Version 2, June 1991

 Copyright (C) 1989, 1991 Free Software Foundation, Inc.
    59 Temple Place, Suite 330, Boston, MA  02111-1307  USA
 Everyone is permitted to copy and distribute verbatim copies
 of this license document, but changing it is not allowed.

			    Preamble

  The licenses for most software are designed to take away your
freedom to share and change it.  By contrast, the GNU General Public
License is intended to guarantee your freedom to share and change free
software--to make sure the software is free for all its users.  This
General Public License applies to most of the Free Software
Foundation's software and to any other program whose authors commit to
using it.  (Some other Free Software Foundation software is covered by
the GNU Library General Public License instead.)  You can apply it to
your programs, too.

  When we speak of free software, we are referring to freedom, not
price.  Our General Public Licenses are designed to make sure that you
have the freedom to distribute copies of free software (and charge for
this service if you wish), that you receive source code or can get it
if you want it, that you can change the software or use pieces of it
in new free programs; and that you know you can do these things.

  To protect your rights, we need to make restrictions that forbid
anyone to deny you these rights or to ask you to surrender the rights.
These restrictions translate to certain responsibilities for you if you
distribute copies of the software, or if you modify it.

  For example, if you distribute copies of such a program, whether
gratis or for a fee, you must give the recipients all the rights that
you have.  You must make sure that they, too, receive or can get the
source code.  And you must show them these terms so they know their
rights.

  We protect your rights with two steps: (1) copyright the software, and
(2) offer you this license which gives you legal permission to copy,
distribute and/or modify the software.

  Also, for each author's protection and ours, we want to make certain
that everyone understands that there is no warranty for this free
software.  If the software is modified by someone else and passed on, we
want its recipients to know that what they have is not the original, so
that any problems introduced by others will not reflect on the original
authors' reputations.

  Finally, any free program is threatened constantly by software
patents.  We wish to avoid the danger that redistributors of a free
program will individually obtain patent licenses, in effect making the
program proprietary.  To prevent this, we have made it clear that any
patent must be licensed for everyone's free use or not licensed at all.

  The precise terms and conditions for copying, distribution and
modification follow.

		    GNU GENERAL PUBLIC LICENSE
   TERMS AND CONDITIONS FOR COPYING, DISTRIBUTION AND MODIFICATION

  0. This License applies to any program or other work which contains
a notice placed by the copyright holder saying it may be distributed
under the terms of this General Public License.  The "Program", below,
refers to any such program or work, and a "work based on the Program"
means either the Program or any derivative work under copyright law:
that is to say, a work containing the Program or a portion of it,
either verbatim or with modifications and/or translated into another
language.  (Hereinafter, translation is included without limitation in
the term "modification".)  Each licensee is addressed as "you".

Activities other than copying, distribution and modification are not
covered by this License; they are outside its scope.  The act of
running the Program is not restricted, and the output from the Program
is covered only if its contents constitute a work based on the
Program (independent of having been made by running the Program).
Whether that is true depends on what the Program does.

  1. You may copy and distribute verbatim copies of the Program's
source code as you receive it, in any medium, provided that you
conspicuously and appropriately publish on each copy an appropriate
copyright notice and disclaimer of warranty; keep intact all the
notices that refer to this License and to the absence of any warranty;
and give any other recipients of the Program a copy of this License
along with the Program.

You may charge a fee for the physical act of transferring a copy, and
you may at your option offer warranty protection in exchange for a fee.

  2. You may modify your copy or copies of the Program or any portion
of it, thus forming a work based on the Program, and copy and
distribute such modifications or work under the terms of Section 1
above, provided that you also meet all of these conditions:

    a) You must cause the modified files to carry prominent notices
    stating that you changed the files and the date of any change.

    b) You must cause any work that you distribute or publish, that in
    whole or in part contains or is derived from the Program or any
    part thereof, to be licensed as a whole at no charge to all third
    parties under the terms of this License.

    c) If the modified program normally reads commands interactively
    when run, you must cause it, when started running for such
    interactive use in the most ordinary way, to print or display an
    announcement including an appropriate copyright notice and a
    notice that there is no warranty (or else, saying that you provide
    a warranty) and that users may redistribute the program under
    these conditions, and telling the user how to view a copy of this
    License.  (Exception: if the Program itself is interactive but
    does not normally print such an announcement, your work based on
    the Program is not required to print an announcement.)

These requirements apply to the modified work as a whole.  If
identifiable sections of that work are not derived from the Program,
and can be reasonably considered independent and separate works in
themselves, then this License, and its terms, do not apply to those
sections when you distribute them as separate works.  But when you
distribute the same sections as part of a whole which is a work based
on the Program, the distribution of the whole must be on the terms of
this License, whose permissions for other licensees extend to the
entire whole, and thus to each and every part regardless of who wrote it.

Thus, it is not the intent of this section to claim rights or contest
your rights to work written entirely by you; rather, the intent is to
exercise the right to control the distribution of derivative or
collective works based on the Program.

In addition, mere aggregation of another work not based on the Program
with the Program (or with a work based on the Program) on a volume of
a storage or distribution medium does not bring the other work under
the scope of this License.

  3. You may copy and distribute the Program (or a work based on it,
under Section 2) in object code or executable form under the terms of
Sections 1 and 2 above provided that you also do one of the following:

    a) Accompany it with the complete corresponding machine-readable
    source code, which must be distributed under the terms of Sections
    1 and 2 above on a medium customarily used for software interchange; or,

    b) Accompany it with a written offer, valid for at least three
    years, to give any third party, for a charge no more than your
    cost of physically performing source distribution, a complete
    machine-readable copy of the corresponding source code, to be
    distributed under the terms of Sections 1 and 2 above on a medium
    customarily used for software interchange; or,

    c) Accompany it with the information you received as to the offer
    to distribute corresponding source code.  (This alternative is
    allowed only for noncommercial distribution and only if you
    received the program in object code or executable form with such
    an offer, in accord with Subsection b above.)

The source code for a work means the preferred form of the work for
making modifications to it.  For an executable work, complete source
code means all the source code for all modules it contains, plus any
associated interface definition files, plus the scripts used to
control compilation and installation of the executable.  However, as a
special exception, the source code distributed need not include
anything that is normally distributed (in either source or binary
form) with the major components (compiler, kernel, and so on) of the
operating system on which the executable runs, unless that component
itself accompanies the executable.

If distribution of executable or object code is made by offering
access to copy from a designated place, then offering equivalent
access to copy the source code from the same place counts as
distribution of the source code, even though third parties are not
compelled to copy the source along with the object code.

  4. You may not copy, modify, sublicense, or distribute the Program
except as expressly provided under this License.  Any attempt
otherwise to copy, modify, sublicense or distribute the Program is
void, and will automatically terminate your rights under this License.
However, parties who have received copies, or rights, from you under
this License will not have their licenses terminated so long as such
parties remain in full compliance.

  5. You are not required to accept this License, since you have not
signed it.  However, nothing else grants you permission to modify or
distribute the Program or its derivative works.  These actions are
prohibited by law if you do not accept this License.  Therefore, by
modifying or distributing the Program (or any work based on the
Program), you indicate your acceptance of this License to do so, and
all its terms and conditions for copying, distributing or modifying
the Program or works based on it.

  6. Each time you redistribute the Program (or any work based on the
Program), the recipient automatically receives a license from the
original licensor to copy, distribute or modify the Program subject to
these terms and conditions.  You may not impose any further
restrictions on the recipients' exercise of the rights granted herein.
You are not responsible for enforcing compliance by third parties to
this License.

  7. If, as a consequence of a court judgment or allegation of patent
infringement or for any other reason (not limited to patent issues),
conditions are imposed on you (whether by court order, agreement or
otherwise) that contradict the conditions of this License, they do not
excuse you from the conditions of this License.  If you cannot
distribute so as to satisfy simultaneously your obligations under this
License and any other pertinent obligations, then as a consequence you
may not distribute the Program at all.  For example, if a patent
license would not permit royalty-free redistribution of the Program by
all those who receive copies directly or indirectly through you, then
the only way you could satisfy both it and this License would be to
refrain entirely from distribution of the Program.

If any portion of this section is held invalid or unenforceable under
any particular circumstance, the balance of the section is intended to
apply and the section as a whole is intended to apply in other
circumstances.

It is not the purpose of this section to induce you to infringe any
patents or other property right claims or to contest validity of any
such claims; this section has the sole purpose of protecting the
integrity of the free software distribution system, which is
implemented by public license practices.  Many people have made
generous contributions to the wide range of software distributed
through that system in reliance on consistent application of that
system; it is up to the author/donor to decide if he or she is willing
to distribute software through any other system and a licensee cannot
impose that choice.

This section is intended to make thoroughly clear what is believed to
be a consequence of the rest of this License.

  8. If the distribution and/or use of the Program is restricted in
certain countries either by patents or by copyrighted interfaces, the
original copyright holder who places the Program under this License
may add an explicit geographical distribution limitation excluding
those countries, so that distribution is permitted only in or among
countries not thus excluded.  In such case, this License incorporates
the limitation as if written in the body of this License.

  9. The Free Software Foundation may publish revised and/or new versions
of the General Public License from time to time.  Such new versions will
be similar in spirit to the present version, but may differ in detail to
address new problems or concerns.

Each version is given a distinguishing version number.  If the Program
specifies a version number of this License which applies to it and "any
later version", you have the option of following the terms and conditions
either of that version or of any later version published by the Free
Software Foundation.  If the Program does not specify a version number of
this License, you may choose any version ever published by the Free Software
Foundation.

  10. If you wish to incorporate parts of the Program into other free
programs whose distribution conditions are different, write to the author
to ask for permission.  For software which is copyrighted by the Free
Software Foundation, write to the Free Software Foundation; we sometimes
make exceptions for this.  Our decision will be guided by the two goals
of preserving the free status of all derivatives of our free software and
of promoting the sharing and reuse of software generally.

			    NO WARRANTY

  11. BECAUSE THE PROGRAM IS LICENSED FREE OF CHARGE, THERE IS NO WARRANTY
FOR THE PROGRAM, TO THE EXTENT PERMITTED BY APPLICABLE LAW.  EXCEPT WHEN
OTHERWISE STATED IN WRITING THE COPYRIGHT HOLDERS AND/OR OTHER PARTIES
PROVIDE THE PROGRAM "AS IS" WITHOUT WARRANTY OF ANY KIND, EITHER EXPRESSED
OR IMPLIED, INCLUDING, BUT NOT LIMITED TO, THE IMPLIED WARRANTIES OF
MERCHANTABILITY AND FITNESS FOR A PARTICULAR PURPOSE.  THE ENTIRE RISK AS
TO THE QUALITY AND PERFORMANCE OF THE PROGRAM IS WITH YOU.  SHOULD THE
PROGRAM PROVE DEFECTIVE, YOU ASSUME THE COST OF ALL NECESSARY SERVICING,
REPAIR OR CORRECTION.

  12. IN NO EVENT UNLESS REQUIRED BY APPLICABLE LAW OR AGREED TO IN WRITING
WILL ANY COPYRIGHT HOLDER, OR ANY OTHER PARTY WHO MAY MODIFY AND/OR
REDISTRIBUTE THE PROGRAM AS PERMITTED ABOVE, BE LIABLE TO YOU FOR DAMAGES,
INCLUDING ANY GENERAL, SPECIAL, INCIDENTAL OR CONSEQUENTIAL DAMAGES ARISING
OUT OF THE USE OR INABILITY TO USE THE PROGRAM (INCLUDING BUT NOT LIMITED
TO LOSS OF DATA OR DATA BEING RENDERED INACCURATE OR LOSSES SUSTAINED BY
YOU OR THIRD PARTIES OR A FAILURE OF THE PROGRAM TO OPERATE WITH ANY OTHER
PROGRAMS), EVEN IF SUCH HOLDER OR OTHER PARTY HAS BEEN ADVISED OF THE
POSSIBILITY OF SUCH DAMAGES.

		     END OF TERMS AND CONDITIONS

	    How to Apply These Terms to Your New Programs

  If you develop a new program, and you want it to be of the greatest
possible use to the public, the best way to achieve this is to make it
free software which everyone can redistribute and change under these terms.

  To do so, attach the following notices to the program.  It is safest
to attach them to the start of each source file to most effectively
convey the exclusion of warranty; and each file should have at least
the "copyright" line and a pointer to where the full notice is found.

    <one line to give the program's name and a brief idea of what it does.>
    Copyright (C) <year>  <name of author>

    This program is free software; you can redistribute it and/or modify
    it under the terms of the GNU General Public License as published by
    the Free Software Foundation; either version 2 of the License, or
    (at your option) any later version.

    This program is distributed in the hope that it will be useful,
    but WITHOUT ANY WARRANTY; without even the implied warranty of
    MERCHANTABILITY or FITNESS FOR A PARTICULAR PURPOSE.  See the
    GNU General Public License for more details.

    You should have received a copy of the GNU General Public License
    along with this program; if not, write to the Free Software
    Foundation, Inc., 59 Temple Place, Suite 330, Boston, MA  02111-1307  USA


Also add information on how to contact you by electronic and paper mail.

If the program is interactive, make it output a short notice like this
when it starts in an interactive mode:

    Gnomovision version 69, Copyright (C) year name of author
    Gnomovision comes with ABSOLUTELY NO WARRANTY; for details type `show w'.
    This is free software, and you are welcome to redistribute it
    under certain conditions; type `show c' for details.

The hypothetical commands `show w' and `show c' should show the appropriate
parts of the General Public License.  Of course, the commands you use may
be called something other than `show w' and `show c'; they could even be
mouse-clicks or menu items--whatever suits your program.

You should also get your employer (if you work as a programmer) or your
school, if any, to sign a "copyright disclaimer" for the program, if
necessary.  Here is a sample; alter the names:

  Yoyodyne, Inc., hereby disclaims all copyright interest in the program
  `Gnomovision' (which makes passes at compilers) written by James Hacker.

  <signature of Ty Coon>, 1 April 1989
  Ty Coon, President of Vice

This General Public License does not permit incorporating your program into
proprietary programs.  If your program is a subroutine library, you may
consider it more useful to permit linking proprietary applications with the
library.  If this is what you want to do, use the GNU Library General
Public License instead of this License.
                OpenLDAP Public License

The OpenLDAP Public License
  Version 2.8.1, 25 November 2003

Redistribution and use of this software and associated documentation
("Software"), with or without modification, are permitted provided
that the following conditions are met:

1. Redistributions in source form must retain copyright statements
   and notices,

2. Redistributions in binary form must reproduce applicable copyright
   statements and notices, this list of conditions, and the following
   disclaimer in the documentation and/or other materials provided
   with the distribution, and

3. Redistributions must contain a verbatim copy of this document.

The OpenLDAP Foundation may revise this license from time to time.
Each revision is distinguished by a version number.  You may use
this Software under terms of this license revision or under the
terms of any subsequent revision of the license.

THIS SOFTWARE IS PROVIDED BY THE OPENLDAP FOUNDATION AND ITS
CONTRIBUTORS ``AS IS'' AND ANY EXPRESSED OR IMPLIED WARRANTIES,
INCLUDING, BUT NOT LIMITED TO, THE IMPLIED WARRANTIES OF MERCHANTABILITY
AND FITNESS FOR A PARTICULAR PURPOSE ARE DISCLAIMED.  IN NO EVENT
SHALL THE OPENLDAP FOUNDATION, ITS CONTRIBUTORS, OR THE AUTHOR(S)
OR OWNER(S) OF THE SOFTWARE BE LIABLE FOR ANY DIRECT, INDIRECT,
INCIDENTAL, SPECIAL, EXEMPLARY, OR CONSEQUENTIAL DAMAGES (INCLUDING,
BUT NOT LIMITED TO, PROCUREMENT OF SUBSTITUTE GOODS OR SERVICES;
LOSS OF USE, DATA, OR PROFITS; OR BUSINESS INTERRUPTION) HOWEVER
CAUSED AND ON ANY THEORY OF LIABILITY, WHETHER IN CONTRACT, STRICT
LIABILITY, OR TORT (INCLUDING NEGLIGENCE OR OTHERWISE) ARISING IN
ANY WAY OUT OF THE USE OF THIS SOFTWARE, EVEN IF ADVISED OF THE
POSSIBILITY OF SUCH DAMAGE.

The names of the authors and copyright holders must not be used in
advertising or otherwise to promote the sale, use or other dealing
in this Software without specific, written prior permission.  Title
to copyright in this Software shall at all times remain with copyright
holders.

OpenLDAP is a registered trademark of the OpenLDAP Foundation.

Copyright 1999-2003 The OpenLDAP Foundation, Redwood City,
California, USA.  All rights reserved.  Permission to copy and
distribute verbatim copies of this document is granted.
                IBM PUBLIC LICENSE VERSION 1.0 - SECURE MAILER

THE ACCOMPANYING PROGRAM IS PROVIDED UNDER THE TERMS OF THIS IBM PUBLIC
LICENSE ("AGREEMENT").  ANY USE, REPRODUCTION OR DISTRIBUTION OF THE
PROGRAM CONSTITUTES RECIPIENT'S ACCEPTANCE OF THIS AGREEMENT.

1.  DEFINITIONS

"Contribution" means:
    a) in the case of International Business Machines Corporation ("IBM"),
       the Original Program, and
    b) in the case of each Contributor,
       i)  changes to the Program, and
       ii) additions to the Program;
           where such changes and/or additions to the Program originate
           from and are distributed by that particular Contributor.
           A Contribution 'originates' from a Contributor if it was added
           to the Program by such Contributor itself or anyone acting on
           such Contributor's behalf.
    Contributions do not include additions to the Program which:
       (i)  are separate modules of software distributed in conjunction
            with the Program under their own license agreement, and
       (ii) are not derivative works of the Program.

"Contributor" means IBM and any other entity that distributes the Program.

"Licensed Patents " mean patent claims licensable by a Contributor which
are necessarily infringed by the use or sale of its Contribution alone
or when combined with the Program.

"Original Program" means the original version of the software accompanying
this Agreement as released by IBM, including source code, object code
and documentation, if any.

"Program" means the Original Program and Contributions.

"Recipient" means anyone who receives the Program under this Agreement,
including all Contributors.

2.  GRANT OF RIGHTS

    a) Subject to the terms of this Agreement, each Contributor hereby
    grants Recipient a non-exclusive, worldwide, royalty-free copyright
    license to reproduce, prepare derivative works of, publicly display,
    publicly perform, distribute and sublicense the Contribution of such
    Contributor, if any, and such derivative works, in source code and
    object code form.

    b) Subject to the terms of this Agreement, each Contributor hereby
    grants Recipient a non-exclusive, worldwide, royalty-free patent
    license under Licensed Patents to make, use, sell, offer to sell,
    import and otherwise transfer the Contribution of such Contributor,
    if any, in source code and object code form.  This patent license
    shall apply to the combination of the Contribution and the Program
    if, at the time the Contribution is added by the Contributor, such
    addition of the Contribution causes such combination to be covered
    by the Licensed Patents.  The patent license shall not apply to any
    other combinations which include the Contribution.  No hardware per
    se is licensed hereunder.

    c) Recipient understands that although each Contributor grants the
    licenses to its Contributions set forth herein, no assurances are
    provided by any Contributor that the Program does not infringe the
    patent or other intellectual property rights of any other entity.
    Each Contributor disclaims any liability to Recipient for claims
    brought by any other entity based on infringement of intellectual
    property rights or otherwise.  As a condition to exercising the rights
    and licenses granted hereunder, each Recipient hereby assumes sole
    responsibility to secure any other intellectual property rights
    needed, if any.  For example, if a third party patent license
    is required to allow Recipient to distribute the Program, it is
    Recipient's responsibility to acquire that license before distributing
    the Program.

    d) Each Contributor represents that to its knowledge it has sufficient
    copyright rights in its Contribution, if any, to grant the copyright
    license set forth in this Agreement.

3.  REQUIREMENTS

A Contributor may choose to distribute the Program in object code form
under its own license agreement, provided that:
    a) it complies with the terms and conditions of this Agreement; and
    b) its license agreement:
       i)   effectively disclaims on behalf of all Contributors all
            warranties and conditions, express and implied, including
            warranties or conditions of title and non-infringement, and
            implied warranties or conditions of merchantability and fitness
            for a particular purpose;
       ii)  effectively excludes on behalf of all Contributors all
            liability for damages, including direct, indirect, special,
            incidental and consequential damages, such as lost profits;
       iii) states that any provisions which differ from this Agreement
            are offered by that Contributor alone and not by any other
            party; and
       iv)  states that source code for the Program is available from
            such Contributor, and informs licensees how to obtain it in a
            reasonable manner on or through a medium customarily used for
            software exchange.

When the Program is made available in source code form:
    a) it must be made available under this Agreement; and
    b) a copy of this Agreement must be included with each copy of the
       Program.

Each Contributor must include the following in a conspicuous location
in the Program:

    Copyright (c) 1997,1998,1999, International Business Machines
    Corporation and others. All Rights Reserved.

In addition, each Contributor must identify itself as the originator of
its Contribution, if any, in a manner that reasonably allows subsequent
Recipients to identify the originator of the Contribution.

4.  COMMERCIAL DISTRIBUTION

Commercial distributors of software may accept certain responsibilities
with respect to end users, business partners and the like.  While this
license is intended to facilitate the commercial use of the Program, the
Contributor who includes the Program in a commercial product offering
should do so in a manner which does not create potential liability for
other Contributors.   Therefore, if a Contributor includes the Program in
a commercial product offering, such Contributor ("Commercial Contributor")
hereby agrees to defend and indemnify every other Contributor
("Indemnified Contributor") against any losses, damages and costs
(collectively "Losses") arising from claims, lawsuits and other legal
actions brought by a third party against the Indemnified Contributor to
the extent caused by the acts or omissions of such Commercial Contributor
in connection with its distribution of the Program in a commercial
product offering.  The obligations in this section do not apply to any
claims or Losses relating to any actual or alleged intellectual property
infringement.  In order to qualify, an Indemnified Contributor must:
    a) promptly notify the Commercial Contributor in writing of such claim,
and
    b) allow the Commercial Contributor to control, and cooperate with
       the Commercial Contributor in, the defense and any related
       settlement negotiations.  The Indemnified Contributor may
       participate in any such claim at its own expense.

For example, a Contributor might include the Program in a commercial
product offering, Product X.  That Contributor is then a Commercial
Contributor.  If that Commercial Contributor then makes performance
claims, or offers warranties related to Product X, those performance
claims and warranties are such Commercial Contributor's responsibility
alone.  Under this section, the Commercial Contributor would have to
defend claims against the other Contributors related to those performance
claims and warranties, and if a court requires any other Contributor to
pay any damages as a result, the Commercial Contributor must pay those
damages.

5.  NO WARRANTY

EXCEPT AS EXPRESSLY SET FORTH IN THIS AGREEMENT, THE PROGRAM IS PROVIDED
ON AN "AS IS" BASIS, WITHOUT WARRANTIES OR CONDITIONS OF ANY KIND, EITHER
EXPRESS OR IMPLIED INCLUDING, WITHOUT LIMITATION, ANY WARRANTIES OR
CONDITIONS OF TITLE, NON-INFRINGEMENT, MERCHANTABILITY OR FITNESS FOR A
PARTICULAR PURPOSE. Each Recipient is solely responsible for determining
the appropriateness of using and distributing the Program and assumes
all risks associated with its exercise of rights under this Agreement,
including but not limited to the risks and costs of program errors,
compliance with applicable laws, damage to or loss of data, programs or
equipment, and unavailability or interruption of operations.

6.  DISCLAIMER OF LIABILITY

EXCEPT AS EXPRESSLY SET FORTH IN THIS AGREEMENT, NEITHER RECIPIENT NOR
ANY CONTRIBUTORS SHALL HAVE ANY LIABILITY FOR ANY DIRECT, INDIRECT,
INCIDENTAL, SPECIAL, EXEMPLARY, OR CONSEQUENTIAL DAMAGES (INCLUDING
WITHOUT LIMITATION LOST PROFITS), HOWEVER CAUSED AND ON ANY THEORY OF
LIABILITY, WHETHER IN CONTRACT, STRICT LIABILITY, OR TORT (INCLUDING
NEGLIGENCE OR OTHERWISE) ARISING IN ANY WAY OUT OF THE USE OR DISTRIBUTION
OF THE PROGRAM OR THE EXERCISE OF ANY RIGHTS GRANTED HEREUNDER, EVEN IF
ADVISED OF THE POSSIBILITY OF SUCH DAMAGES.

7.  GENERAL

If any provision of this Agreement is invalid or unenforceable under
applicable law, it shall not affect the validity or enforceability of
the remainder of the terms of this Agreement, and without further action
by the parties hereto, such provision shall be reformed to the minimum
extent necessary to make such provision valid and enforceable.

If Recipient institutes patent litigation against a Contributor with
respect to a patent applicable to software (including a cross-claim or
counterclaim in a lawsuit), then any patent licenses granted by that
Contributor to such Recipient under this Agreement shall terminate
as of the date such litigation is filed.  In addition, If Recipient
institutes patent litigation against any entity (including a cross-claim
or counterclaim in a lawsuit) alleging that the Program itself (excluding
combinations of the Program with other software or hardware) infringes
such Recipient's patent(s), then such Recipient's rights granted under
Section 2(b) shall terminate as of the date such litigation is filed.

All Recipient's rights under this Agreement shall terminate if it fails
to comply with any of the material terms or conditions of this Agreement
and does not cure such failure in a reasonable period of time after
becoming aware of such noncompliance.  If all Recipient's rights under
this Agreement terminate, Recipient agrees to cease use and distribution
of the Program as soon as reasonably practicable.  However, Recipient's
obligations under this Agreement and any licenses granted by Recipient
relating to the Program shall continue and survive.

IBM may publish new versions (including revisions) of this Agreement
from time to time.  Each new version of the Agreement will be given a
distinguishing version number.  The Program (including Contributions)
may always be distributed subject to the version of the Agreement under
which it was received. In addition, after a new version of the Agreement
is published, Contributor may elect to distribute the Program (including
its Contributions) under the new version. No one other than IBM has the
right to modify this Agreement.  Except as expressly stated in Sections
2(a) and 2(b) above, Recipient receives no rights or licenses to the
intellectual property of any Contributor under this Agreement, whether
expressly, by implication, estoppel or otherwise.  All rights in the
Program not expressly granted under this Agreement are reserved.

This Agreement is governed by the laws of the State of New York and the
intellectual property laws of the United States of America. No party to
this Agreement will bring a legal action under this Agreement more than
one year after the cause of action arose.  Each party waives its rights
to a jury trial in any resulting litigation.
                PostgreSQL is released under the BSD license.

PostgreSQL Database Management System
(formerly known as Postgres, then as Postgres95)

Portions Copyright (c) 1996-2005, The PostgreSQL Global Development Group

Portions Copyright (c) 1994, The Regents of the University of California

Permission to use, copy, modify, and distribute this software and its
documentation for any purpose, without fee, and without a written
agreement is hereby granted, provided that the above copyright
notice and this paragraph and the following two paragraphs appear
in all copies.

IN NO EVENT SHALL THE UNIVERSITY OF CALIFORNIA BE LIABLE TO ANY
PARTY FOR DIRECT, INDIRECT, SPECIAL, INCIDENTAL, OR CONSEQUENTIAL
DAMAGES, INCLUDING LOST PROFITS, ARISING OUT OF THE USE OF THIS
SOFTWARE AND ITS DOCUMENTATION, EVEN IF THE UNIVERSITY
OF CALIFORNIA HAS BEEN ADVISED OF THE POSSIBILITY OF SUCH DAMAGE.

THE UNIVERSITY OF CALIFORNIA SPECIFICALLY DISCLAIMS ANY WARRANTIES,
INCLUDING, BUT NOT LIMITED TO, THE IMPLIED WARRANTIES OF
MERCHANTABILITY AND FITNESS FOR A PARTICULAR PURPOSE.
THE SOFTWARE PROVIDED HEREUNDER IS ON AN "AS IS" BASIS,
AND THE UNIVERSITY OF CALIFORNIA HAS NO OBLIGATIONS TO
PROVIDE MAINTENANCE, SUPPORT, UPDATES, ENHANCEMENTS,
OR MODIFICATIONS.
                         Python 2.3.4 license

This is the official license for the Python 2.3.4 release:

A. HISTORY OF THE SOFTWARE
==========================

Python was created in the early 1990s by Guido van Rossum at Stichting
Mathematisch Centrum (CWI, see http://www.cwi.nl) in the Netherlands
as a successor of a language called ABC.  Guido remains Python's
principal author, although it includes many contributions from others.

In 1995, Guido continued his work on Python at the Corporation for
National Research Initiatives (CNRI, see http://www.cnri.reston.va.us)
in Reston, Virginia where he released several versions of the
software.

In May 2000, Guido and the Python core development team moved to
BeOpen.com to form the BeOpen PythonLabs team.  In October of the same
year, the PythonLabs team moved to Digital Creations (now Zope
Corporation, see http://www.zope.com).  In 2001, the Python Software
Foundation (PSF, see http://www.python.org/psf/) was formed, a
non-profit organization created specifically to own Python-related
Intellectual Property.  Zope Corporation is a sponsoring member of
the PSF.

All Python releases are Open Source (see http://www.opensource.org for
the Open Source Definition).  Historically, most, but not all, Python
releases have also been GPL-compatible; the table below summarizes
the various releases.

    Release         Derived     Year        Owner       GPL-
                    from                                compatible? (1)

    0.9.0 thru 1.2              1991-1995   CWI         yes
    1.3 thru 1.5.2  1.2         1995-1999   CNRI        yes
    1.6             1.5.2       2000        CNRI        no
    2.0             1.6         2000        BeOpen.com  no
    1.6.1           1.6         2001        CNRI        yes (2)
    2.1             2.0+1.6.1   2001        PSF         no
    2.0.1           2.0+1.6.1   2001        PSF         yes
    2.1.1           2.1+2.0.1   2001        PSF         yes
    2.2             2.1.1       2001        PSF         yes
    2.1.2           2.1.1       2002        PSF         yes
    2.1.3           2.1.2       2002        PSF         yes
    2.2.1           2.2         2002        PSF         yes
    2.2.2           2.2.1       2002        PSF         yes
    2.3             2.2.2       2002-2003   PSF         yes
    2.3.1           2.3         2002-2003   PSF         yes
    2.3.2           2.3.1       2002-2003   PSF         yes
    2.3.3           2.3.2       2002-2003   PSF         yes
    2.3.4           2.3.3       2004        PSF         yes

Footnotes:

(1) GPL-compatible doesn't mean that we're distributing Python under
    the GPL.  All Python licenses, unlike the GPL, let you distribute
    a modified version without making your changes open source.  The
    GPL-compatible licenses make it possible to combine Python with
    other software that is released under the GPL; the others don't.

(2) According to Richard Stallman, 1.6.1 is not GPL-compatible,
    because its license has a choice of law clause.  According to
    CNRI, however, Stallman's lawyer has told CNRI's lawyer that 1.6.1
    is "not incompatible" with the GPL.

Thanks to the many outside volunteers who have worked under Guido's
direction to make these releases possible.


B. TERMS AND CONDITIONS FOR ACCESSING OR OTHERWISE USING PYTHON
===============================================================

PSF LICENSE AGREEMENT FOR PYTHON 2.3
--------------------------------------

1. This LICENSE AGREEMENT is between the Python Software Foundation
("PSF"), and the Individual or Organization ("Licensee") accessing and
otherwise using Python 2.3 software in source or binary form and its
associated documentation.

2. Subject to the terms and conditions of this License Agreement, PSF
hereby grants Licensee a nonexclusive, royalty-free, world-wide
license to reproduce, analyze, test, perform and/or display publicly,
prepare derivative works, distribute, and otherwise use Python 2.3
alone or in any derivative version, provided, however, that PSF's
License Agreement and PSF's notice of copyright, i.e., "Copyright (c)
2001, 2002, 2003 Python Software Foundation; All Rights Reserved" are
retained in Python 2.3 alone or in any derivative version prepared by
Licensee.

3. In the event Licensee prepares a derivative work that is based on
or incorporates Python 2.3 or any part thereof, and wants to make
the derivative work available to others as provided herein, then
Licensee hereby agrees to include in any such work a brief summary of
the changes made to Python 2.3.

4. PSF is making Python 2.3 available to Licensee on an "AS IS"
basis.  PSF MAKES NO REPRESENTATIONS OR WARRANTIES, EXPRESS OR
IMPLIED.  BY WAY OF EXAMPLE, BUT NOT LIMITATION, PSF MAKES NO AND
DISCLAIMS ANY REPRESENTATION OR WARRANTY OF MERCHANTABILITY OR FITNESS
FOR ANY PARTICULAR PURPOSE OR THAT THE USE OF PYTHON 2.3 WILL NOT
INFRINGE ANY THIRD PARTY RIGHTS.

5. PSF SHALL NOT BE LIABLE TO LICENSEE OR ANY OTHER USERS OF PYTHON
2.3 FOR ANY INCIDENTAL, SPECIAL, OR CONSEQUENTIAL DAMAGES OR LOSS AS
A RESULT OF MODIFYING, DISTRIBUTING, OR OTHERWISE USING PYTHON 2.3,
OR ANY DERIVATIVE THEREOF, EVEN IF ADVISED OF THE POSSIBILITY THEREOF.

6. This License Agreement will automatically terminate upon a material
breach of its terms and conditions.

7. Nothing in this License Agreement shall be deemed to create any
relationship of agency, partnership, or joint venture between PSF and
Licensee.  This License Agreement does not grant permission to use PSF
trademarks or trade name in a trademark sense to endorse or promote
products or services of Licensee, or any third party.

8. By copying, installing or otherwise using Python 2.3, Licensee
agrees to be bound by the terms and conditions of this License
Agreement.


BEOPEN.COM LICENSE AGREEMENT FOR PYTHON 2.0
-------------------------------------------

BEOPEN PYTHON OPEN SOURCE LICENSE AGREEMENT VERSION 1

1. This LICENSE AGREEMENT is between BeOpen.com ("BeOpen"), having an
office at 160 Saratoga Avenue, Santa Clara, CA 95051, and the
Individual or Organization ("Licensee") accessing and otherwise using
this software in source or binary form and its associated
documentation ("the Software").

2. Subject to the terms and conditions of this BeOpen Python License
Agreement, BeOpen hereby grants Licensee a non-exclusive,
royalty-free, world-wide license to reproduce, analyze, test, perform
and/or display publicly, prepare derivative works, distribute, and
otherwise use the Software alone or in any derivative version,
provided, however, that the BeOpen Python License is retained in the
Software, alone or in any derivative version prepared by Licensee.

3. BeOpen is making the Software available to Licensee on an "AS IS"
basis.  BEOPEN MAKES NO REPRESENTATIONS OR WARRANTIES, EXPRESS OR
IMPLIED.  BY WAY OF EXAMPLE, BUT NOT LIMITATION, BEOPEN MAKES NO AND
DISCLAIMS ANY REPRESENTATION OR WARRANTY OF MERCHANTABILITY OR FITNESS
FOR ANY PARTICULAR PURPOSE OR THAT THE USE OF THE SOFTWARE WILL NOT
INFRINGE ANY THIRD PARTY RIGHTS.

4. BEOPEN SHALL NOT BE LIABLE TO LICENSEE OR ANY OTHER USERS OF THE
SOFTWARE FOR ANY INCIDENTAL, SPECIAL, OR CONSEQUENTIAL DAMAGES OR LOSS
AS A RESULT OF USING, MODIFYING OR DISTRIBUTING THE SOFTWARE, OR ANY
DERIVATIVE THEREOF, EVEN IF ADVISED OF THE POSSIBILITY THEREOF.

5. This License Agreement will automatically terminate upon a material
breach of its terms and conditions.

6. This License Agreement shall be governed by and interpreted in all
respects by the law of the State of California, excluding conflict of
law provisions.  Nothing in this License Agreement shall be deemed to
create any relationship of agency, partnership, or joint venture
between BeOpen and Licensee.  This License Agreement does not grant
permission to use BeOpen trademarks or trade names in a trademark
sense to endorse or promote products or services of Licensee, or any
third party.  As an exception, the "BeOpen Python" logos available at
http://www.pythonlabs.com/logos.html may be used according to the
permissions granted on that web page.

7. By copying, installing or otherwise using the software, Licensee
agrees to be bound by the terms and conditions of this License
Agreement.


CNRI LICENSE AGREEMENT FOR PYTHON 1.6.1
---------------------------------------

1. This LICENSE AGREEMENT is between the Corporation for National
Research Initiatives, having an office at 1895 Preston White Drive,
Reston, VA 20191 ("CNRI"), and the Individual or Organization
("Licensee") accessing and otherwise using Python 1.6.1 software in
source or binary form and its associated documentation.

2. Subject to the terms and conditions of this License Agreement, CNRI
hereby grants Licensee a nonexclusive, royalty-free, world-wide
license to reproduce, analyze, test, perform and/or display publicly,
prepare derivative works, distribute, and otherwise use Python 1.6.1
alone or in any derivative version, provided, however, that CNRI's
License Agreement and CNRI's notice of copyright, i.e., "Copyright (c)
1995-2001 Corporation for National Research Initiatives; All Rights
Reserved" are retained in Python 1.6.1 alone or in any derivative
version prepared by Licensee.  Alternately, in lieu of CNRI's License
Agreement, Licensee may substitute the following text (omitting the
quotes): "Python 1.6.1 is made available subject to the terms and
conditions in CNRI's License Agreement.  This Agreement together with
Python 1.6.1 may be located on the Internet using the following
unique, persistent identifier (known as a handle): 1895.22/1013.  This
Agreement may also be obtained from a proxy server on the Internet
using the following URL: http://hdl.handle.net/1895.22/1013".

3. In the event Licensee prepares a derivative work that is based on
or incorporates Python 1.6.1 or any part thereof, and wants to make
the derivative work available to others as provided herein, then
Licensee hereby agrees to include in any such work a brief summary of
the changes made to Python 1.6.1.

4. CNRI is making Python 1.6.1 available to Licensee on an "AS IS"
basis.  CNRI MAKES NO REPRESENTATIONS OR WARRANTIES, EXPRESS OR
IMPLIED.  BY WAY OF EXAMPLE, BUT NOT LIMITATION, CNRI MAKES NO AND
DISCLAIMS ANY REPRESENTATION OR WARRANTY OF MERCHANTABILITY OR FITNESS
FOR ANY PARTICULAR PURPOSE OR THAT THE USE OF PYTHON 1.6.1 WILL NOT
INFRINGE ANY THIRD PARTY RIGHTS.

5. CNRI SHALL NOT BE LIABLE TO LICENSEE OR ANY OTHER USERS OF PYTHON
1.6.1 FOR ANY INCIDENTAL, SPECIAL, OR CONSEQUENTIAL DAMAGES OR LOSS AS
A RESULT OF MODIFYING, DISTRIBUTING, OR OTHERWISE USING PYTHON 1.6.1,
OR ANY DERIVATIVE THEREOF, EVEN IF ADVISED OF THE POSSIBILITY THEREOF.

6. This License Agreement will automatically terminate upon a material
breach of its terms and conditions.

7. This License Agreement shall be governed by the federal
intellectual property law of the United States, including without
limitation the federal copyright law, and, to the extent such
U.S. federal law does not apply, by the law of the Commonwealth of
Virginia, excluding Virginia's conflict of law provisions.
Notwithstanding the foregoing, with regard to derivative works based
on Python 1.6.1 that incorporate non-separable material that was
previously distributed under the GNU General Public License (GPL), the
law of the Commonwealth of Virginia shall govern this License
Agreement only as to issues arising under or with respect to
Paragraphs 4, 5, and 7 of this License Agreement.  Nothing in this
License Agreement shall be deemed to create any relationship of
agency, partnership, or joint venture between CNRI and Licensee.  This
License Agreement does not grant permission to use CNRI trademarks or
trade name in a trademark sense to endorse or promote products or
services of Licensee, or any third party.

8. By clicking on the "ACCEPT" button where indicated, or by copying,
installing or otherwise using Python 1.6.1, Licensee agrees to be
bound by the terms and conditions of this License Agreement.

        ACCEPT


CWI LICENSE AGREEMENT FOR PYTHON 0.9.0 THROUGH 1.2
--------------------------------------------------

Copyright (c) 1991 - 1995, Stichting Mathematisch Centrum Amsterdam,
The Netherlands.  All rights reserved.

Permission to use, copy, modify, and distribute this software and its
documentation for any purpose and without fee is hereby granted,
provided that the above copyright notice appear in all copies and that
both that copyright notice and this permission notice appear in
supporting documentation, and that the name of Stichting Mathematisch
Centrum or CWI not be used in advertising or publicity pertaining to
distribution of the software without specific, written prior
permission.

STICHTING MATHEMATISCH CENTRUM DISCLAIMS ALL WARRANTIES WITH REGARD TO
THIS SOFTWARE, INCLUDING ALL IMPLIED WARRANTIES OF MERCHANTABILITY AND
FITNESS, IN NO EVENT SHALL STICHTING MATHEMATISCH CENTRUM BE LIABLE
FOR ANY SPECIAL, INDIRECT OR CONSEQUENTIAL DAMAGES OR ANY DAMAGES
WHATSOEVER RESULTING FROM LOSS OF USE, DATA OR PROFITS, WHETHER IN AN
ACTION OF CONTRACT, NEGLIGENCE OR OTHER TORTIOUS ACTION, ARISING OUT
OF OR IN CONNECTION WITH THE USE OR PERFORMANCE OF THIS SOFTWARE.
                 GNU Free Documentation License
		  Version 1.2, November 2002


 Copyright (C) 2000,2001,2002  Free Software Foundation, Inc.
     59 Temple Place, Suite 330, Boston, MA  02111-1307  USA
 Everyone is permitted to copy and distribute verbatim copies
 of this license document, but changing it is not allowed.


0. PREAMBLE

The purpose of this License is to make a manual, textbook, or other
functional and useful document "free" in the sense of freedom: to
assure everyone the effective freedom to copy and redistribute it,
with or without modifying it, either commercially or noncommercially.
Secondarily, this License preserves for the author and publisher a way
to get credit for their work, while not being considered responsible
for modifications made by others.

This License is a kind of "copyleft", which means that derivative
works of the document must themselves be free in the same sense.  It
complements the GNU General Public License, which is a copyleft
license designed for free software.

We have designed this License in order to use it for manuals for free
software, because free software needs free documentation: a free
program should come with manuals providing the same freedoms that the
software does.  But this License is not limited to software manuals;
it can be used for any textual work, regardless of subject matter or
whether it is published as a printed book.  We recommend this License
principally for works whose purpose is instruction or reference.


1. APPLICABILITY AND DEFINITIONS

This License applies to any manual or other work, in any medium, that
contains a notice placed by the copyright holder saying it can be
distributed under the terms of this License.  Such a notice grants a
world-wide, royalty-free license, unlimited in duration, to use that
work under the conditions stated herein.  The "Document", below,
refers to any such manual or work.  Any member of the public is a
licensee, and is addressed as "you".  You accept the license if you
copy, modify or distribute the work in a way requiring permission
under copyright law.

A "Modified Version" of the Document means any work containing the
Document or a portion of it, either copied verbatim, or with
modifications and/or translated into another language.

A "Secondary Section" is a named appendix or a front-matter section of
the Document that deals exclusively with the relationship of the
publishers or authors of the Document to the Document's overall subject
(or to related matters) and contains nothing that could fall directly
within that overall subject.  (Thus, if the Document is in part a
textbook of mathematics, a Secondary Section may not explain any
mathematics.)  The relationship could be a matter of historical
connection with the subject or with related matters, or of legal,
commercial, philosophical, ethical or political position regarding
them.

The "Invariant Sections" are certain Secondary Sections whose titles
are designated, as being those of Invariant Sections, in the notice
that says that the Document is released under this License.  If a
section does not fit the above definition of Secondary then it is not
allowed to be designated as Invariant.  The Document may contain zero
Invariant Sections.  If the Document does not identify any Invariant
Sections then there are none.

The "Cover Texts" are certain short passages of text that are listed,
as Front-Cover Texts or Back-Cover Texts, in the notice that says that
the Document is released under this License.  A Front-Cover Text may
be at most 5 words, and a Back-Cover Text may be at most 25 words.

A "Transparent" copy of the Document means a machine-readable copy,
represented in a format whose specification is available to the
general public, that is suitable for revising the document
straightforwardly with generic text editors or (for images composed of
pixels) generic paint programs or (for drawings) some widely available
drawing editor, and that is suitable for input to text formatters or
for automatic translation to a variety of formats suitable for input
to text formatters.  A copy made in an otherwise Transparent file
format whose markup, or absence of markup, has been arranged to thwart
or discourage subsequent modification by readers is not Transparent.
An image format is not Transparent if used for any substantial amount
of text.  A copy that is not "Transparent" is called "Opaque".

Examples of suitable formats for Transparent copies include plain
ASCII without markup, Texinfo input format, LaTeX input format, SGML
or XML using a publicly available DTD, and standard-conforming simple
HTML, PostScript or PDF designed for human modification.  Examples of
transparent image formats include PNG, XCF and JPG.  Opaque formats
include proprietary formats that can be read and edited only by
proprietary word processors, SGML or XML for which the DTD and/or
processing tools are not generally available, and the
machine-generated HTML, PostScript or PDF produced by some word
processors for output purposes only.

The "Title Page" means, for a printed book, the title page itself,
plus such following pages as are needed to hold, legibly, the material
this License requires to appear in the title page.  For works in
formats which do not have any title page as such, "Title Page" means
the text near the most prominent appearance of the work's title,
preceding the beginning of the body of the text.

A section "Entitled XYZ" means a named subunit of the Document whose
title either is precisely XYZ or contains XYZ in parentheses following
text that translates XYZ in another language.  (Here XYZ stands for a
specific section name mentioned below, such as "Acknowledgements",
"Dedications", "Endorsements", or "History".)  To "Preserve the Title"
of such a section when you modify the Document means that it remains a
section "Entitled XYZ" according to this definition.

The Document may include Warranty Disclaimers next to the notice which
states that this License applies to the Document.  These Warranty
Disclaimers are considered to be included by reference in this
License, but only as regards disclaiming warranties: any other
implication that these Warranty Disclaimers may have is void and has
no effect on the meaning of this License.


2. VERBATIM COPYING

You may copy and distribute the Document in any medium, either
commercially or noncommercially, provided that this License, the
copyright notices, and the license notice saying this License applies
to the Document are reproduced in all copies, and that you add no other
conditions whatsoever to those of this License.  You may not use
technical measures to obstruct or control the reading or further
copying of the copies you make or distribute.  However, you may accept
compensation in exchange for copies.  If you distribute a large enough
number of copies you must also follow the conditions in section 3.

You may also lend copies, under the same conditions stated above, and
you may publicly display copies.


3. COPYING IN QUANTITY

If you publish printed copies (or copies in media that commonly have
printed covers) of the Document, numbering more than 100, and the
Document's license notice requires Cover Texts, you must enclose the
copies in covers that carry, clearly and legibly, all these Cover
Texts: Front-Cover Texts on the front cover, and Back-Cover Texts on
the back cover.  Both covers must also clearly and legibly identify
you as the publisher of these copies.  The front cover must present
the full title with all words of the title equally prominent and
visible.  You may add other material on the covers in addition.
Copying with changes limited to the covers, as long as they preserve
the title of the Document and satisfy these conditions, can be treated
as verbatim copying in other respects.

If the required texts for either cover are too voluminous to fit
legibly, you should put the first ones listed (as many as fit
reasonably) on the actual cover, and continue the rest onto adjacent
pages.

If you publish or distribute Opaque copies of the Document numbering
more than 100, you must either include a machine-readable Transparent
copy along with each Opaque copy, or state in or with each Opaque copy
a computer-network location from which the general network-using
public has access to download using public-standard network protocols
a complete Transparent copy of the Document, free of added material.
If you use the latter option, you must take reasonably prudent steps,
when you begin distribution of Opaque copies in quantity, to ensure
that this Transparent copy will remain thus accessible at the stated
location until at least one year after the last time you distribute an
Opaque copy (directly or through your agents or retailers) of that
edition to the public.

It is requested, but not required, that you contact the authors of the
Document well before redistributing any large number of copies, to give
them a chance to provide you with an updated version of the Document.


4. MODIFICATIONS

You may copy and distribute a Modified Version of the Document under
the conditions of sections 2 and 3 above, provided that you release
the Modified Version under precisely this License, with the Modified
Version filling the role of the Document, thus licensing distribution
and modification of the Modified Version to whoever possesses a copy
of it.  In addition, you must do these things in the Modified Version:

A. Use in the Title Page (and on the covers, if any) a title distinct
   from that of the Document, and from those of previous versions
   (which should, if there were any, be listed in the History section
   of the Document).  You may use the same title as a previous version
   if the original publisher of that version gives permission.
B. List on the Title Page, as authors, one or more persons or entities
   responsible for authorship of the modifications in the Modified
   Version, together with at least five of the principal authors of the
   Document (all of its principal authors, if it has fewer than five),
   unless they release you from this requirement.
C. State on the Title page the name of the publisher of the
   Modified Version, as the publisher.
D. Preserve all the copyright notices of the Document.
E. Add an appropriate copyright notice for your modifications
   adjacent to the other copyright notices.
F. Include, immediately after the copyright notices, a license notice
   giving the public permission to use the Modified Version under the
   terms of this License, in the form shown in the Addendum below.
G. Preserve in that license notice the full lists of Invariant Sections
   and required Cover Texts given in the Document's license notice.
H. Include an unaltered copy of this License.
I. Preserve the section Entitled "History", Preserve its Title, and add
   to it an item stating at least the title, year, new authors, and
   publisher of the Modified Version as given on the Title Page.  If
   there is no section Entitled "History" in the Document, create one
   stating the title, year, authors, and publisher of the Document as
   given on its Title Page, then add an item describing the Modified
   Version as stated in the previous sentence.
J. Preserve the network location, if any, given in the Document for
   public access to a Transparent copy of the Document, and likewise
   the network locations given in the Document for previous versions
   it was based on.  These may be placed in the "History" section.
   You may omit a network location for a work that was published at
   least four years before the Document itself, or if the original
   publisher of the version it refers to gives permission.
K. For any section Entitled "Acknowledgements" or "Dedications",
   Preserve the Title of the section, and preserve in the section all
   the substance and tone of each of the contributor acknowledgements
   and/or dedications given therein.
L. Preserve all the Invariant Sections of the Document,
   unaltered in their text and in their titles.  Section numbers
   or the equivalent are not considered part of the section titles.
M. Delete any section Entitled "Endorsements".  Such a section
   may not be included in the Modified Version.
N. Do not retitle any existing section to be Entitled "Endorsements"
   or to conflict in title with any Invariant Section.
O. Preserve any Warranty Disclaimers.

If the Modified Version includes new front-matter sections or
appendices that qualify as Secondary Sections and contain no material
copied from the Document, you may at your option designate some or all
of these sections as invariant.  To do this, add their titles to the
list of Invariant Sections in the Modified Version's license notice.
These titles must be distinct from any other section titles.

You may add a section Entitled "Endorsements", provided it contains
nothing but endorsements of your Modified Version by various
parties--for example, statements of peer review or that the text has
been approved by an organization as the authoritative definition of a
standard.

You may add a passage of up to five words as a Front-Cover Text, and a
passage of up to 25 words as a Back-Cover Text, to the end of the list
of Cover Texts in the Modified Version.  Only one passage of
Front-Cover Text and one of Back-Cover Text may be added by (or
through arrangements made by) any one entity.  If the Document already
includes a cover text for the same cover, previously added by you or
by arrangement made by the same entity you are acting on behalf of,
you may not add another; but you may replace the old one, on explicit
permission from the previous publisher that added the old one.

The author(s) and publisher(s) of the Document do not by this License
give permission to use their names for publicity for or to assert or
imply endorsement of any Modified Version.


5. COMBINING DOCUMENTS

You may combine the Document with other documents released under this
License, under the terms defined in section 4 above for modified
versions, provided that you include in the combination all of the
Invariant Sections of all of the original documents, unmodified, and
list them all as Invariant Sections of your combined work in its
license notice, and that you preserve all their Warranty Disclaimers.

The combined work need only contain one copy of this License, and
multiple identical Invariant Sections may be replaced with a single
copy.  If there are multiple Invariant Sections with the same name but
different contents, make the title of each such section unique by
adding at the end of it, in parentheses, the name of the original
author or publisher of that section if known, or else a unique number.
Make the same adjustment to the section titles in the list of
Invariant Sections in the license notice of the combined work.

In the combination, you must combine any sections Entitled "History"
in the various original documents, forming one section Entitled
"History"; likewise combine any sections Entitled "Acknowledgements",
and any sections Entitled "Dedications".  You must delete all sections
Entitled "Endorsements".


6. COLLECTIONS OF DOCUMENTS

You may make a collection consisting of the Document and other documents
released under this License, and replace the individual copies of this
License in the various documents with a single copy that is included in
the collection, provided that you follow the rules of this License for
verbatim copying of each of the documents in all other respects.

You may extract a single document from such a collection, and distribute
it individually under this License, provided you insert a copy of this
License into the extracted document, and follow this License in all
other respects regarding verbatim copying of that document.


7. AGGREGATION WITH INDEPENDENT WORKS

A compilation of the Document or its derivatives with other separate
and independent documents or works, in or on a volume of a storage or
distribution medium, is called an "aggregate" if the copyright
resulting from the compilation is not used to limit the legal rights
of the compilation's users beyond what the individual works permit.
When the Document is included in an aggregate, this License does not
apply to the other works in the aggregate which are not themselves
derivative works of the Document.

If the Cover Text requirement of section 3 is applicable to these
copies of the Document, then if the Document is less than one half of
the entire aggregate, the Document's Cover Texts may be placed on
covers that bracket the Document within the aggregate, or the
electronic equivalent of covers if the Document is in electronic form.
Otherwise they must appear on printed covers that bracket the whole
aggregate.


8. TRANSLATION

Translation is considered a kind of modification, so you may
distribute translations of the Document under the terms of section 4.
Replacing Invariant Sections with translations requires special
permission from their copyright holders, but you may include
translations of some or all Invariant Sections in addition to the
original versions of these Invariant Sections.  You may include a
translation of this License, and all the license notices in the
Document, and any Warranty Disclaimers, provided that you also include
the original English version of this License and the original versions
of those notices and disclaimers.  In case of a disagreement between
the translation and the original version of this License or a notice
or disclaimer, the original version will prevail.

If a section in the Document is Entitled "Acknowledgements",
"Dedications", or "History", the requirement (section 4) to Preserve
its Title (section 1) will typically require changing the actual
title.


9. TERMINATION

You may not copy, modify, sublicense, or distribute the Document except
as expressly provided for under this License.  Any other attempt to
copy, modify, sublicense or distribute the Document is void, and will
automatically terminate your rights under this License.  However,
parties who have received copies, or rights, from you under this
License will not have their licenses terminated so long as such
parties remain in full compliance.


10. FUTURE REVISIONS OF THIS LICENSE

The Free Software Foundation may publish new, revised versions
of the GNU Free Documentation License from time to time.  Such new
versions will be similar in spirit to the present version, but may
differ in detail to address new problems or concerns.  See
http://www.gnu.org/copyleft/.

Each version of the License is given a distinguishing version number.
If the Document specifies that a particular numbered version of this
License "or any later version" applies to it, you have the option of
following the terms and conditions either of that specified version or
of any later version that has been published (not as a draft) by the
Free Software Foundation.  If the Document does not specify a version
number of this License, you may choose any version ever published (not
as a draft) by the Free Software Foundation.